

Building your own 10×12 shed is more than just a weekend project; it’s an investment in your home, a solution for your storage needs, and a deeply rewarding experience. But where do you start? Many online guides offer bits and pieces—a confusing diagram here, an incomplete material list there. We decided to fix that. This is the ultimate, all-in-one resource for building your 10×12 shed. We’ve consolidated everything you need into one comprehensive, step-by-step guide. From navigating building permits and preparing your site to a detailed material list with costs, high-quality diagrams for every step, and finishing touches that will make your shed last for decades. Whether you’re a seasoned builder or an ambitious beginner, this guide will empower you to build a high-quality shed with confidence. Let’s get started.
Planning Your 10×12 Shed Project: What to Know Before You Start
A successful 10×12 shed project begins long before you pick up a hammer. This initial planning phase is the most critical step, as it sets the foundation for a smooth, efficient, and budget-friendly build. A well-placed, thoughtfully designed shed will serve you for years, while a poorly planned one can become a source of constant frustration. Let’s walk through the key considerations to ensure your project is a success from the start.
Define Your Shed’s Purpose
First, ask yourself: What is the primary job of this shed? The answer will shape every decision you make, from window placement to door size. A 10×12 shed offers a generous 120 square feet of space, but how you use it matters.
- Storage Shed: If you’re storing lawn mowers, wheelbarrows, and garden tools, you’ll want a wide door for easy access and durable flooring. You may not need any windows.
- Workshop: A DIY workshop requires ample natural light, so you’ll want to plan for multiple windows. You should also consider the placement of workbenches and the need for electrical wiring.
- Backyard Office or Studio: This use case demands better insulation, more windows for a pleasant interior, and careful consideration for running electricity and even internet connectivity.
Pro-Tip: Sketch a rough floor plan. Where will you place large items like a workbench or riding mower? Planning your interior layout now helps you determine the best location for the door and windows.
Choose the Perfect Location
Your shed’s location is just as important as its design. Walk around your property and evaluate potential spots based on the following criteria:
- Level Ground: Building on a flat, level surface will save you a significant amount of time and effort when constructing the foundation.
- Good Drainage: Avoid low-lying areas where water pools after rain. Poor drainage can lead to moisture damage, rot, and a compromised foundation.
- Accessibility: Consider the path to and from the shed. You’ll need a clear route to carry building materials to the site and, later, to move equipment in and out of the finished shed.
- Zoning and Utilities: Before you get your heart set on a spot, you’ll need to check local building codes for “setback” requirements—the minimum distance your shed must be from property lines, fences, and your house. It’s also crucial to confirm there are no underground utility lines in your chosen build area.
If you want to explore different customization options before you commit, the design tool at https://www.diysheds.co.uk/wizard can help you visualize the final build.
Estimated Cost, Time, and Difficulty Level
Embarking on a DIY shed project is an exciting venture. Before you start cutting lumber, it’s vital to have a clear picture of the resources you’ll need to invest. This 10×12 shed is one of many large garden shed plans you can build for spacious storage. Here’s a realistic breakdown of the cost, time, and skill level required for this specific project.
Estimated Building Cost
The total cost for a 10×12 shed typically falls between $2,800 and $4,500. This is a broad range because several key factors will influence your final budget. If you’re exploring different budget options, our guide to affordable large shed plans can provide more ideas.
- Lumber Prices: The cost of wood is the biggest variable and fluctuates based on your location and market conditions.
- Foundation Type: A simple on-grade skid foundation is the most budget-friendly, while a concrete slab will significantly increase costs.
- Siding and Roofing: Basic T1-11 plywood siding and standard asphalt shingles are economical choices. Upgrading to vinyl siding, LP SmartSide, or a metal roof will raise the price but may offer better longevity and aesthetics.
- Finishing Details: The cost of windows, paint, hardware, and interior shelving can add up, so be sure to factor them into your budget.
Pro-Tip: Get quotes from multiple lumber yards and look for sales on materials like roofing and siding to find the best deals.
Estimated Time Commitment
For a team of two people with moderate DIY experience, expect the project to take 4 to 6 full days of work (approximately 40-60 hours). It’s best to break this down over several weekends to avoid burnout.
- Weekend 1 (1-2 Days): Site preparation, building the foundation, and assembling the floor frame.
- Weekend 2 (1-2 Days): Framing all four walls and raising them into position.
- Weekend 3 (2-3 Days): Constructing the roof trusses, installing sheathing, and adding siding, trim, and roofing materials.
- Weekend 4 (1 Day): Building and hanging the door, painting, and applying final weatherproofing touches.
Your timeline will vary based on your skill level, the weather, and how much help you have. Remember, precision is more important than speed.
Project Difficulty Level: Intermediate
We rate this project as Intermediate. While our step-by-step guide is designed to be clear and easy to follow, building a shed from scratch requires a solid understanding of basic carpentry.
You should be comfortable with:
- Reading plans and taking precise measurements.
- Making straight and accurate cuts with a circular saw.
- Safely operating power tools like drills and nail guns.
- Lifting heavy objects (wall frames and roof trusses), which makes having a helper essential.
An ambitious beginner can absolutely complete this project, but we recommend practicing your cutting skills on scrap wood first and always prioritizing safety. If you’d like to browse other designs before committing, our collection of free garden shed DIY plans is an excellent resource. For help exploring different material options and finalizing your design, the tool at https://www.diysheds.co.uk/wizard can be a great starting point.
Complete 10×12 Shed Tool and Material List
A successful shed build begins long before you cut the first piece of lumber. Proper preparation is the single most important factor in ensuring a smooth, efficient, and enjoyable project, a key theme in our ultimate 2024 building guide. Having every tool and all your materials on-site before you start prevents frustrating interruptions and costly, time-wasting trips to the hardware store.
This guide provides a comprehensive overview of everything you’ll need. We’ve organized it into two detailed sections that follow: one for tools and another for materials. Use these as your master checklist to plan your purchases and gather your equipment.
How to Prepare for Your Build
Before you head to the store, take the time to do a full inventory. You might be surprised by how many of the necessary tools and supplies you already own.
- Take Inventory: Go through the tool and material lists in the following sections and check off everything you currently have. This will give you a clear picture of what you need to buy, borrow, or rent.
- Buy vs. Rent: For expensive, specialized tools like a pneumatic framing nailer or a power miter saw, renting can be a far more cost-effective option than buying, especially if you don’t plan on tackling more large-scale projects soon.
- Plan Your Shopping Trip: Create a detailed shopping list from the items you don’t have. To save time, consider ordering your lumber and materials for delivery directly to your home. This saves you the hassle of transporting long boards and heavy sheets of plywood.
While the lists below are designed to be exhaustive for a standard 10×12 gable shed, small design changes can alter your material needs. If you’ve customized your design or want a list tailored to a different style, you can explore our collection of free garden shed DIY plans or get a precise, itemized breakdown using our powerful shed design tool.
Now, let’s get into the specifics of what you’ll need to bring your 10×12 shed to life. The next two sections detail every tool and piece of material required for the job.
Tools You’ll Need for the Build

Having the right tools on hand before you start is the secret to a smooth, safe, and successful shed build. While you can build a shed with basic hand tools, a few key power tools will dramatically speed up the process and improve the quality of your finished project.
Essential Tools for Every Builder
These are the non-negotiable tools you’ll need for measuring, cutting, and assembling your shed frame. Don’t start your project without them.
- Safety Gear: Always prioritize safety. You’ll need safety glasses to protect your eyes from sawdust and debris, and a good pair of work gloves to prevent splinters and improve your grip.
- Measuring & Layout: Accuracy starts here. A 25-foot tape measure, a 7-inch speed square for quick 90-degree marks, and a 4-foot level are crucial for ensuring your foundation, walls, and roof are perfectly square and plumb. A chalk line is essential for snapping long, straight lines for cuts and layouts.
- Cutting & Fastening: A powerful circular saw is the workhorse of this project, used for cutting everything from floor joists to roof sheathing. You’ll also need a reliable power drill/driver for driving screws and drilling pilot holes, along with a classic framing hammer for nailing.
- Support: A sturdy pair of sawhorses provides a stable surface for cutting lumber, and at least one step ladder (two is better) is necessary for safely working on the walls and roof.
Recommended Tools for a Faster Build
These tools aren’t strictly necessary, but they will save you significant time and effort, leading to a more professional-looking result. Consider renting them for the weekend if you don’t own them.
- Miter Saw: For perfectly clean and accurate angled cuts on your roof rafters and trim boards, a miter saw is unbeatable. It delivers precision that’s difficult to achieve with a circular saw alone.
- Pneumatic Nailer (Framing Nailer): This is a game-changer. A framing nailer will cut your wall assembly time by more than half compared to using a hammer. It drives nails quickly and consistently, reducing fatigue and improving the structural integrity of your frame.
- Caulking Gun: Essential for the finishing stages to apply sealant around windows, doors, and trim, making your shed completely weatherproof.
If you’re unsure which tools or materials are best for the specific shed you have in mind, you can get a customized list tailored to your design. For a personalized tool and material checklist, try our powerful shed building wizard at https://www.diysheds.co.uk/wizard today.
Complete 10×12 Shed Material List (with Quantities)
Getting your materials organized is the first major step toward a successful build. This comprehensive list is based on a standard 10×12 gable-roof shed with 8-foot walls and a simple skid foundation. Quantities include a small overage (~10%) to account for cuts and potential mistakes. Always confirm current pricing with your local lumber yard, as costs can vary significantly.
Foundation and Floor Structure
This is the base of your shed. Using pressure-treated (PT) lumber is non-negotiable for any wood that will be in contact with or close to the ground to prevent rot and insect damage.
- Skids: (3) 4×6 PT beams, 12′ long
- Floor Frame: (2) 2×6 PT boards, 12′ long (for rim joists)
- Floor Joists: (10) 2×6 PT boards, 10′ long (to be cut to 9′ 9″ each)
- Floor Decking: (4) 4’x8′ sheets of 3/4″ tongue-and-groove plywood or OSB
- Foundation Base: Crushed gravel to create a 4-6 inch deep level pad (approx. 2.5 cubic yards)
- Fasteners: 1 lb box of 3″ exterior-rated deck screws
Wall & Roof Framing
This is the skeleton of your shed. Standard (non-treated) lumber is acceptable here as it will be protected from the elements by your siding and roofing.
- Wall Framing: (65) 2×4 studs, 8′ long (for wall plates, studs, and door/window framing)
- Roof Rafters: (14) 2×6 boards, 8′ long (for a 5/12 pitch; buy 10′ boards for a steeper pitch)
- Ridge Board: (1) 2×6 board, 12′ long
- Gussets: (1) 4’x4′ sheet of 1/2″ plywood (for reinforcing truss joints)
- Wall & Roof Sheathing: (18) 4’x8′ sheets of 1/2″ OSB or plywood
- Hardware: (26) Hurricane ties to connect rafters to walls
- Fasteners: 5 lb box of 3-1/2″ framing nails and a 3 lb box of 2″ sheathing nails
Exterior Finishing and Hardware
These materials provide weather protection and give your shed its final look. The siding quantity is based on 4’x8′ sheets; adjust if using lap siding.
- Siding: (12) 4’x8′ sheets of siding (e.g., T1-11 or LP SmartSide)
- Trim: (8) 1×4 boards, 8′ long (for corner and door trim)
- Fascia: (4) 1×6 boards, 10′ long (for roof edges)
- Roofing Underlayment: (1) roll of roofing felt (min. 200 sq. ft. coverage)
- Shingles: (6) bundles of architectural or 3-tab asphalt shingles
- Drip Edge: (5) 10′ sections of metal drip edge
- Door Hardware: (1) set of heavy-duty T-hinges and (1) hasp latch or handle set
- Fasteners: 2 lb box of 1-1/4″ roofing nails and a 1 lb box of 2″ siding nails
Pro-Tip: This list is for a specific, common shed design. If you’re planning a different style or size, be sure to check out our other free garden shed DIY plans and adjust your materials accordingly. To get a precise, custom-generated materials list for your unique project, you can also use the helpful design tool at https://www.diysheds.co.uk/wizard.
Step 1: Site Preparation and Building the Foundation
With your plan and materials organized, it’s time to break ground. This is the most important step in the entire project—a solid, level foundation ensures your shed will stand strong for years, preventing issues like a sagging floor, binding doors, and uneven settling. A poorly built foundation will compromise every subsequent step.
We will focus on building a simple and effective on-grade skid foundation, which is perfect for most DIYers. This method uses pressure-treated wood “skids” that rest on a bed of gravel and concrete blocks, elevating the shed to prevent rot and ensure stability.
Site Selection and Leveling
Before you dig, choose your location wisely. A few minutes of planning here will save you hours of labor.
- Find the Right Spot: Look for a relatively flat area in your yard with good drainage. Avoid low spots where water tends to pool after it rains. Also, consider accessibility for moving materials during the build and for using the shed afterward.
- Clear the Area: Mark out a footprint slightly larger than the shed itself (e.g., 11×13 feet). Remove all grass, weeds, large rocks, and roots from this area.
- Level the Ground: This is a non-negotiable task. Use a shovel to remove high spots and a rake to spread the soil evenly. To check for level, lay a long, straight 2×4 board across the area with a 4-foot level on top. Check for levelness in all directions—side to side, front to back, and diagonally. A perfectly level site is the key to a square and stable structure.
How to Build a Simple Skid Foundation
Once your site is level, you can build the foundation that will support your shed’s floor frame.
- Lay Landscape Fabric: Cover the entire cleared area with heavy-duty landscape fabric. This will prevent weeds from growing up under your shed.
- Add a Gravel Base: Spread a 4-inch layer of compactable gravel (like 3/4-inch crushed stone) over the landscape fabric. This creates a stable base that allows for excellent drainage.
- Tamp and Level the Gravel: Use a hand tamper to compact the gravel until it is firm. Use your long 2×4 and level again to ensure the gravel pad itself is perfectly flat.
- Position Concrete Blocks: Place solid concrete deck blocks at each corner and in the middle of each 12-foot side. Use a measuring tape to ensure they are spaced correctly for your 10×12 frame.
- Set the Skids: Lay two or three 12-foot-long pressure-treated 4×6 timbers (the “skids”) onto the blocks. Use your level to make sure the skids are perfectly level with each other. If they aren’t, add or remove small amounts of gravel under the blocks until they are.
This simple foundation provides a rock-solid base for your shed. While a skid foundation is excellent for many situations, different soil types or local regulations may require a different approach, such as a concrete slab. If you’re unsure what’s best for your project, you can explore our other free garden shed DIY plans or get a customized material list and plan using a shed design tool.
Checking Local Building Codes and Permits
Before you hammer a single nail or cut a single board, this is the most critical step you must take. It might seem tedious, but verifying local building codes is the difference between a successful project and a costly mistake. A quick call or visit to your local municipal building department’s website can save you from potential fines, legal disputes with neighbors, or even a demolition order.
Key Regulations to Investigate
When you contact your local authorities, be prepared to ask specific questions about “accessory dwelling units” or “storage sheds.” Your 10×12 shed is exactly 120 square feet, a size that often falls directly on the threshold of many regulations. Here’s what you need to clarify:
- Permit Requirements: The most important question is, “Do I need a permit for a 120-square-foot shed?” While many jurisdictions don’t require permits for structures under 120 or 200 sq ft, others have a lower limit of 100 sq ft. Never assume—always confirm. Knowing the permit threshold is key; if your area allows for a larger structure, you might find our guide to affordable large shed plans useful.
- Setback Requirements: This dictates the minimum distance your shed must be from property lines and other structures. Ask for the specific setback distances from the rear property line, side property lines, and your primary home. A common example is 5 feet from the side/rear lines and 10 feet from the house.
- Height Restrictions: Most areas have a maximum allowable height for accessory buildings, which can influence your roof design. A typical height limit might be 15 feet from the ground to the roof’s peak. Confirming this ensures your planned gable or gambrel roof doesn’t violate local ordinances.
- Foundation Rules: Some municipalities have specific requirements for foundations. Inquire if a simple on-grade foundation (like the skid foundation in this guide) is acceptable or if a permanent concrete slab or frost-proof footings are mandatory.
Pro Tip: While you’re on the phone, also ask if there are any restrictions related to utility easements on your property. You cannot build any permanent structure over an easement. Getting this information upfront is the best insurance for your project. Once you know the rules, you can confidently choose from our free garden shed DIY plans. To further help visualize a shed that meets your specific local codes, you can use an online design tool. For a great way to customize dimensions and features before you build, check out the shed wizard at https://www.diysheds.co.uk/wizard.
How to Build a Simple Skid Foundation
A skid foundation is an excellent choice for a DIY shed builder. It’s strong, relatively simple to construct, and effectively elevates your shed to protect it from ground moisture and pests. By creating a level base of gravel and pressure-treated lumber “skids,” you ensure your shed has the stable, long-lasting support it needs.
Follow these steps to build a reliable skid foundation for your 10×12 shed.
Step 1: Mark and Level the Site
Getting the ground preparation right is the most critical part of the entire foundation process. A mistake here can cause problems with your shed frame, doors, and windows later on.
- Outline the Footprint: Use batter boards, stakes, and string to mark out a precise 10’ x 12’ rectangle. To guarantee your corners are perfect 90-degree angles, measure the two diagonals of the rectangle. Adjust the strings until both diagonal measurements are exactly the same.
- Excavate the Area: Clear all grass, rocks, and topsoil from inside the marked area, extending about 6-12 inches beyond the strings. Dig down about 4 inches to create a shallow, uniform pit.
- Check for Level: Place a long, straight 2×4 across the excavated area with a 4-foot level on top. Check for level in multiple directions. Add or remove soil as needed until the entire base is flat.
Step 2: Add and Compact the Gravel Base
A gravel base provides a solid platform that allows for excellent drainage, preventing water from pooling under your shed.
- Fill the Area: Add a 4-inch layer of all-purpose gravel or 3/4-inch crushed stone into the excavated area.
- Rake and Tamp: Use a garden rake to spread the gravel evenly. Then, use a hand tamper to firmly compact the entire surface. A compacted base prevents the skids from settling over time. Check for level one last time after tamping.
Step 3: Place and Level the Skids
The skids are the pressure-treated timbers that will make direct contact with the gravel and support the entire weight of the shed floor.
- Position the Skids: For a 10×12 shed, you will use three 12-foot-long pressure-treated 4×6 timbers. Lay them parallel to the 12-foot dimension on top of the compacted gravel. Position the two outer skids about 6 inches in from the edge and place the third skid directly in the center.
- Achieve Perfect Level: This requires patience. Place your level across the skids (from one outer skid to the other) and along the length of each individual skid. If a skid is high, gently tap it down into the gravel with a sledgehammer and a scrap piece of wood. If it’s low, pry it up and pack more gravel underneath. Continue making micro-adjustments until all skids are perfectly level with each other and completely stable.
Once your skids are perfectly level and secure, you have a rock-solid foundation ready for the shed floor frame. If you’re looking to explore different shed sizes or styles before committing, you can use an online configuration tool to visualize your options.
Step 2: Building the Shed Floor Frame
With your foundation set and level, it’s time to build the sturdy platform for your shed. The floor frame is constructed directly on top of your foundation skids and serves as the base for the entire structure—a critical step in our complete DIY storage shed plans guide. Precision here is key to ensuring your walls and roof fit together perfectly.
Assembling the Floor Joists
Your first task is to create a 10’x12′ rectangular frame using pressure-treated 2×6 lumber. This lumber is essential for any wood in contact with or near the ground, as it resists rot and insect damage.
- Cut Your Lumber: Measure and cut your pressure-treated 2x6s. You will need:
- Two (2) boards cut to exactly 12 feet long. These are your outer rim joists.
- Nine (9) boards cut to 9 feet 9 inches long. These are your interior joists. The shorter length accounts for the thickness of the two outer rim joists (10 feet – 1.5″ – 1.5″ = 9′ 9″).
- Build the Outer Frame: Lay your two 12-foot rim joists parallel to each other. Fit one 9′ 9″ joist at each end between them to form a large rectangle. Secure the corners by driving three 3-inch galvanized deck screws through the rim joist into the end of the interior joist.
- Square the Frame: Before proceeding, you must check if the frame is square. Measure diagonally from one corner to the opposite corner, then measure the other diagonal. These two measurements must be identical. If they aren’t, gently nudge the frame until they match. An out-of-square floor will cause major headaches later.
- Install Interior Joists: On the inside of both 12-foot rim joists, measure and mark every 16 inches on center. This standard spacing provides robust support for the floor sheathing.
Pro Tip: Look for the “crown” on your joists—a slight upward bow along the narrow edge. Install each joist with the crown facing up. Over time, gravity will flatten the board, creating a stronger, level floor.
Place the remaining interior joists at your 16-inch marks and fasten them by driving 3-inch screws through the outside of the rim joist.
Getting these measurements and cuts just right is crucial for a successful build. If you’re looking for other sizes or styles, be sure to explore our full collection of free garden shed DIY plans. For a plan tailored to specific dimensions or materials, the DIY Sheds design wizard can also instantly generate custom blueprints and material lists for you.
Attaching the Floor Sheathing
With the frame complete and square, the final step is to add the flooring.
Use 3/4-inch tongue-and-groove plywood or OSB for a strong, solid surface. Before laying down each sheet, run a thick bead of construction adhesive along the top of every joist it will cover. This simple step is the secret to a squeak-free shed floor for years to come.
Lay the plywood sheets perpendicular to the joists, ensuring the tongue of one sheet locks into the groove of the next. Secure the sheathing to the joists using 2-inch deck screws every 6 inches along the perimeter and every 8-12 inches in the center of the sheet. Your shed floor is now complete and ready for walls. While this 10×12 size is very popular, if you decide you need even more space, you can also check out our other large garden shed plans.
Step 3: Assembling and Raising the Wall Frames
With your shed floor providing a perfect work surface, it’s time to build the walls. The process involves assembling each of the four walls flat on the deck, sheathing them, and then lifting them into place. This method is safer, more accurate, and much easier than trying to build them in place.
Assembling the Wall Frames
We’ll begin by building the two shorter 10-foot walls, followed by the longer 12-foot walls which will house the door opening.
- Build the Side Walls (10-foot): For each wall, cut two 2x4s to exactly 10 feet long to serve as the top and bottom plates. Your vertical studs should be cut to 92 5/8 inches. This specific length accounts for the thickness of the bottom plate and the two top plates we’ll install, giving you a standard 8-foot interior ceiling height.
- Lay the top and bottom plates parallel on the shed floor.
- Mark your stud positions on both plates. Start your measurement from one end and mark at 15 1/4″, then continue marking every 16 inches. This “16-inch on-center” spacing ensures standard 4×8 sheathing panels will land perfectly in the middle of a stud.
- Place the studs between the plates and drive two 3-inch framing nails through the plates into each end of the studs.
- Build the Front and Back Walls (12-foot): Repeat the process for the 12-foot walls, but you’ll need to frame an opening for your door. This requires a few extra components to ensure the wall remains strong:
- Header: This is a small beam that spans the top of the door opening and carries the weight from the roof. Create one by sandwiching a piece of 1/2″ plywood between two 2x4s, nailed together.
- Jack Studs: These shorter studs fit directly under each end of the header to support it.
- King Studs: These are full-length studs that run alongside the jack studs, connecting the header assembly to the wall plates.
If you’re unsure about the best placement for your door and windows, using a tool like the one at https://www.diysheds.co.uk/wizard can help you visualize the layout and generate a custom plan before you start cutting.
Raising and Securing the Walls
It’s much easier to install sheathing while the walls are on the ground. Lay your 4×8 OSB or plywood panels over the completed frames, fasten them with nails every 6-8 inches, and use a reciprocating saw to cut out the door opening.
This step requires at least one helper.
- Raise the Back Wall: Start with the 12-foot back wall. Carefully tilt it up and slide it into position, flush with the back edge of the shed floor.
- Brace and Plumb: Have your helper hold the wall steady while you attach temporary braces—long 2x4s nailed to a stud and staked to the ground. Use a 4-foot level on the studs to ensure the wall is perfectly vertical, or plumb.
- Secure the Wall: Once plumb, fasten the bottom plate to the floor frame using 3 1/2″ galvanized nails.
- Repeat and Connect: Raise the remaining walls one by one, ensuring each is plumb before securing. As you raise each wall, nail the corners together where the end studs meet.
- Add the Second Top Plate: To lock all four walls together into a single, rigid structure, install a second top plate. Cut these 2x4s so they overlap at the corners, staggering the joints from the plate below. This simple step is critical for the shed’s overall strength.
Step 4: Constructing and Installing the Roof
With the walls up, your shed is starting to take shape! The roof is the crowning element that protects your structure from the elements. We’ll simplify this process by pre-assembling roof trusses on the ground, which is safer and ensures every part is identical.
Building Your Roof Trusses
A roof truss is a triangular frame that forms the roof’s skeleton. Building them all at once on a flat surface like the shed floor is much easier than building the roof piece-by-piece in the air.
- Determine Your Roof Pitch: We recommend a 5/12 pitch for a classic look and good water runoff. This means the roof rises 5 inches for every 12 inches of horizontal distance. If you’re unsure what style is best for your needs, you can explore a variety of options in our ultimate building guide.
- Create a Rafter Template: Using a speed square and a 2×6 board, carefully mark your angles. You’ll need two main cuts: a plumb cut at the top where the rafters meet and a bird’s mouth cut—a small notch that allows the rafter to sit securely on the wall’s top plate. Get this first rafter perfect, as it will be your template for all the others.
- Assemble the Trusses: Lay two completed rafters on the shed floor to form a triangle. Join them at the peak. Measure about one-third of the way down from the peak and install a horizontal 2×4 collar tie between the rafters. To lock everything together, create gussets from scrap 1/2″ plywood. These triangular or square plates are glued and nailed over each joint (at the peak and where the collar tie meets the rafters) on both sides of the truss, creating an incredibly strong frame.
Installing the Trusses and Finishing the Roof
This step requires a helper for safety.
- Set the Trusses: Mark the truss locations on the top plates of your walls, typically every 24 inches on center. Lift the two end trusses (gable ends) into position first and secure them with temporary bracing to ensure they are perfectly vertical. Run a string line tightly between the peaks of the two end trusses. This line will be your guide for setting the remaining “common” trusses perfectly straight.
- Secure and Sheath: Fasten each truss to the wall’s top plate using hurricane ties for maximum wind resistance. Once all trusses are secured, begin installing the roof sheathing (1/2″ OSB or plywood). Start at the bottom edge of the roof and work your way up to the peak, staggering the seams for strength. Use H-clips between the sheets of sheathing for proper spacing and support.
- Make it Watertight: Finish the roof by installing the layers that keep water out. First, attach a metal drip edge around the entire perimeter. Next, roll out roofing felt (tar paper), overlapping each course as you move up the roof. Finally, install your asphalt shingles according to the manufacturer’s directions, starting from the bottom and working your way to the ridge cap. While these plans are for a 10×12 model, the techniques can be adapted if you’re working with large garden shed plans.
Step 5: Building and Hanging the Shed Door
A custom-built door not only saves money but also adds a rustic, sturdy character to your shed that a pre-hung door can’t match. For this project, we’ll construct a classic and durable Z-brace door, which is strong, simple to build, and excellent at preventing sag over time.
Assembling the Door and Z-Brace
First, you need to build the main door panel. This process starts with precise measurements and ends with a rigid, reinforced structure.
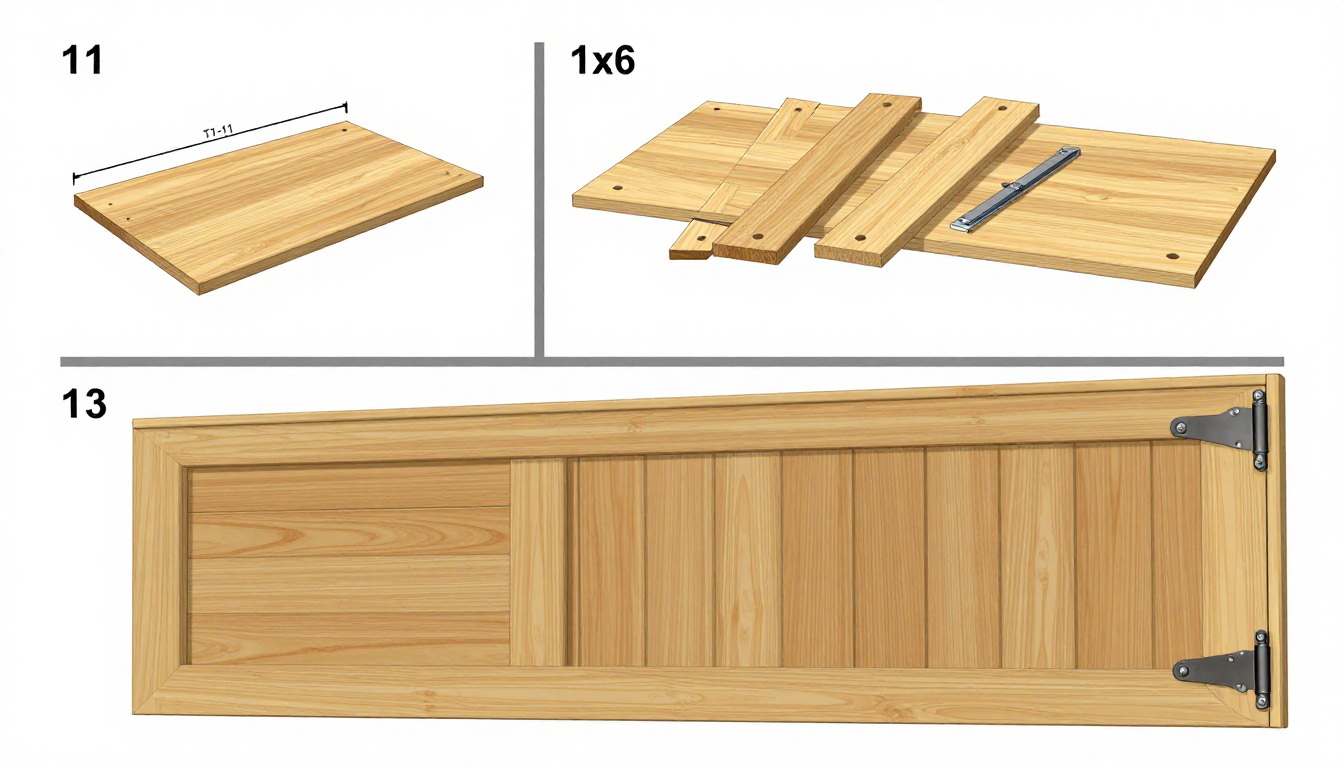
- Measure and Cut the Door Panel: Carefully measure the height and width of the framed door opening on your shed. To ensure smooth operation and prevent binding, your door needs a clearance gap. Subtract 1/2 inch from both the total height and width. This creates a 1/4-inch gap on all four sides. Cut your siding panel (e.g., T1-11 or LP SmartSide) to these final dimensions.
Pro-Tip: Lay the cut siding panel on a flat work surface, with the exterior-facing side down. You will build the brace on the interior-facing side.
- Construct the Z-Brace: Using 1×6 lumber, cut two horizontal boards to match the exact width of your door panel. Then, cut one diagonal board to fit snugly between them, forming a ‘Z’ shape. The diagonal brace provides critical support against gravity and keeps the door square for years, a crucial element for the long-term durability of large garden sheds.
[Image: Diagram of a ‘Z-brace’ pattern laid out on the back of the shed door panel, showing the placement of the two horizontal 1×6 boards and the single diagonal 1×6 board.]
- Attach the Brace: Apply a generous bead of construction adhesive to the back of your three 1×6 brace pieces. Position them on the interior side of the door panel. Secure the brace by driving 1-1/4″ wood screws through the brace boards and into the door panel. Be careful that the screws are not so long that they poke through the front of your door.
Hanging the Door and Installing Hardware
With the door built, the final step is to hang it and add the hardware. This part is much easier with a helper.
- Attach Hinges: For a heavy door, use at least two heavy-duty T-hinges. Position them on the door first, securing them to the horizontal Z-brace boards for maximum strength.
- Position and Shim: Have a helper hold the door in the opening. Use wood shims under the door and on the sides to achieve your perfect 1/4-inch gap all around.
- Secure to Frame: Once the door is perfectly positioned, attach the other side of the hinges to the shed’s door frame. Check that the door swings freely without catching.
- Install Latch: Finally, install the door latch, handle, and any locking mechanism. Ensure the latch aligns correctly and securely fastens the door when closed.
Building a custom door is a rewarding final step in many garden shed DIY plans. If you’d like to explore other door styles or even visualize your entire shed with different options before you build, check out our powerful online shed configuration tool


