
Wood Shed Floor Plans: Build a Durable Base for Your Shed
Welcome to our comprehensive guide about wood shed floor plans.
Introduction: Why a Strong Wood Shed Floor Matters
A shed is more than just a storage unit; it’s an extension of your home, safeguarding your tools, equipment, and valuables from the elements. However, the true strength and longevity of any shed aren’t determined by its walls or roof alone, but by the often-underestimated foundation beneath it. A robust wood shed floor is the unsung hero, bearing the weight of everything stored inside and providing a stable, level surface for years to come.
Why a Solid Foundation is Non-Negotiable
Ignoring the importance of a well-built floor can lead to a host of problems, transforming your shed from a practical asset into a costly liability.
- Weight Distribution and Structural Integrity: Your shed floor needs to support significant loads. Imagine storing heavy lawnmowers, stacked lumber, or even a workbench with power tools. A flimsy floor will sag, warp, or even crack under pressure, compromising the entire shed’s structure. A properly constructed floor, on the other hand, distributes this weight evenly, preventing stress on the walls and roof.
- Protection Against Moisture and Pests: The ground is a constant source of moisture, and an inadequate floor allows this dampness to seep into your shed, leading to wood rot, mold, mildew, and corrosion of metal tools. Furthermore, gaps or weak points in the floor provide easy entry for rodents, insects, and other pests seeking shelter or a new home. A well-sealed and elevated floor acts as a critical barrier.
- Longevity and Value: A shed built on a strong foundation will simply last longer. Investing in a durable floor upfront means fewer repairs, less maintenance, and a shed that retains its functionality and aesthetic appeal for decades. This, in turn, adds greater value to your property.
- Safety and Usability: A stable, level floor is essential for safety. Uneven surfaces can cause trips and falls, and wobbly shelves or workbenches pose a hazard. For those who use their shed as a workshop, a solid floor provides a firm base for tools and machinery, improving efficiency and safety.
What to Expect from This Guide
This comprehensive guide will walk you through every aspect of building a resilient wood shed floor. We’ll delve into:
- Understanding essential components: From joists to decking, you’ll learn the role of each part.
- Exploring various designs: Discover the best floor plans for your specific needs and budget.
- Choosing the right foundation: Match your floor to the ideal base for maximum stability.
- Step-by-step construction: Get clear, actionable instructions for building your floor with confidence.
- Optimizing for durability: Learn how to make your shed floor withstand the test of time and heavy use.
By the end, you’ll have all the knowledge and resources necessary to construct a shed floor that stands strong, protecting your investments and serving your needs for years to come. To get started on your journey to a robust shed, explore various wood shed floor plans and find the perfect design for your project.
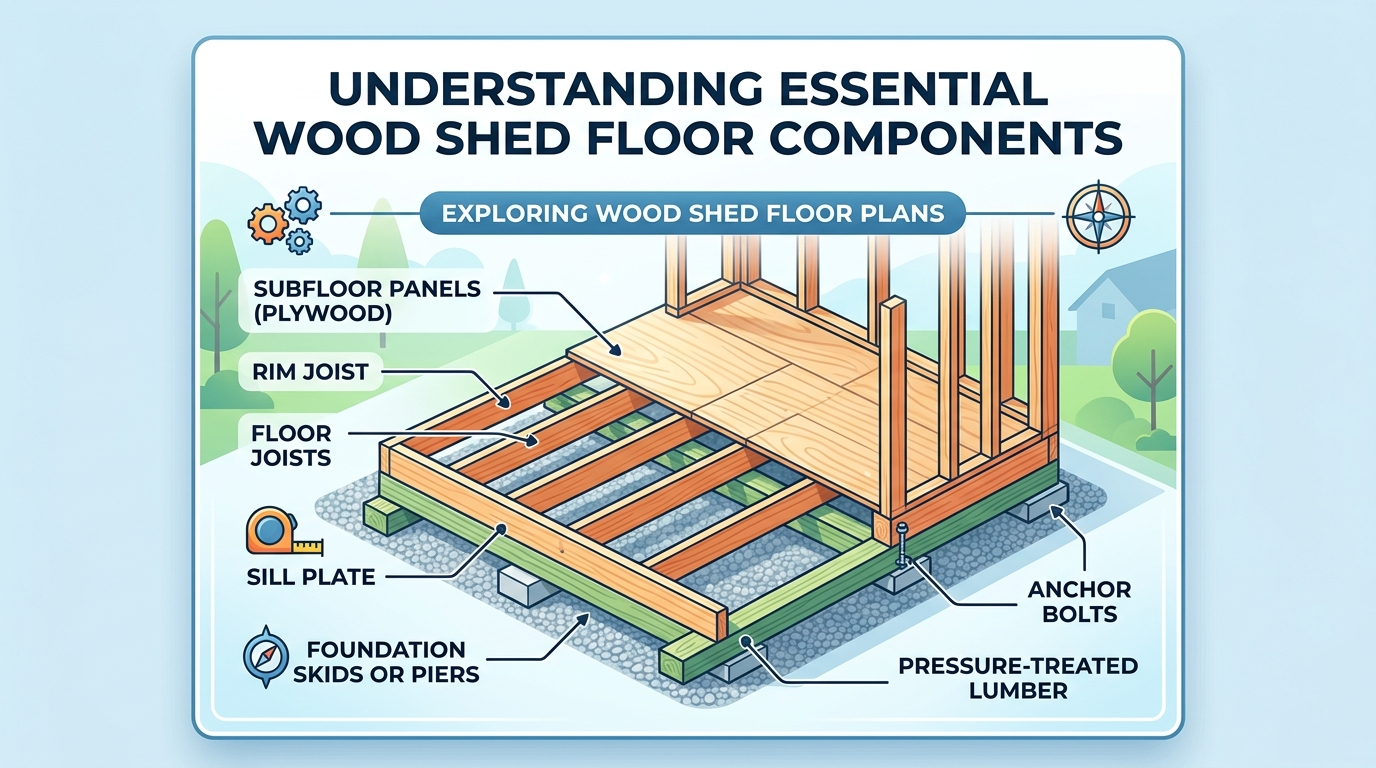
Understanding Essential Wood Shed Floor Components

A robust wood shed floor relies on several interconnected components, each playing a crucial role in its strength, longevity, and resistance to the elements. Understanding these parts is fundamental to building a durable base for your shed.
The Foundation of Support: Framing and Joists
At the heart of any wood shed floor is its framing system. This typically consists of:
- Skids/Runners: These are the primary structural members that rest directly on your chosen foundation (e.g., concrete blocks, gravel pad). They run perpendicular to the floor joists and bear the shed’s weight, distributing it evenly. Often made from pressure-treated 4×4 or 4×6 lumber, skids elevate the shed, protecting the floor from ground moisture.
Tip: Always use pressure-treated lumber for skids to prevent rot and insect damage.
- Floor Joists: These horizontal beams span between the skids, forming the main support structure for the subfloor. Common sizes include 2×4, 2×6, or 2×8 lumber, with the size and spacing (e.g., 16 inches on center) determined by the shed’s size, intended load, and span requirements.
Example: A small garden shed might use 2x4s, while a heavy-duty workshop shed would require 2x6s or 2x8s for added strength.
- Rim Joists/Band Boards: These pieces of lumber run along the perimeter of the floor joists, enclosing the frame and providing rigidity. They are often the same size as the floor joists.
The Durable Surface: Subfloor and Decking
Once the framing is complete, the subfloor provides the solid surface upon which you’ll walk and store items.
- Subfloor Material:
- Plywood: The most common and recommended choice for shed subfloors. Exterior-grade or marine-grade plywood (e.g., CDX plywood) is essential due to its resistance to moisture and ability to withstand outdoor conditions. Thickness typically ranges from 5/8 inch to 3/4 inch, depending on joist spacing and expected load.
- OSB (Oriented Strand Board): A more economical alternative, but generally less water-resistant than plywood. If using OSB, ensure it’s rated for exterior use and take extra precautions for waterproofing.
- Treated Plywood: For ultimate resistance to rot and insects, pressure-treated plywood is an excellent, though more expensive, option for the subfloor.
- Decking/Finished Flooring (Optional): While the subfloor often serves as the final floor, some builders choose to add an additional layer for aesthetics, extra durability, or specific uses. Options include:
- Vinyl Composite Tile (VCT): Good for workshop sheds, easy to clean.
- Rubber Matting: Ideal for areas prone to spills or heavy foot traffic.
- Pressure-Treated Decking Boards: Can be used for a more rustic, open-air shed floor.
Moisture Protection and Anchoring
Protecting your wood floor from moisture and securely anchoring it are critical for its longevity.
- Moisture Barrier: A layer of heavy-duty plastic sheeting (6-mil polyethylene) placed between the ground and the skids, or directly under the subfloor, is crucial to prevent ground moisture from wicking up into the wood.
- Fasteners:
- Galvanized Screws or Nails: Essential for all framing connections. Galvanized fasteners resist rust, which is vital in outdoor structures. Use appropriate lengths to ensure strong, secure joints.
- Hurricane Ties/Anchors: In windy areas, these metal connectors secure the shed floor to the foundation, preventing uplift.
By understanding how these components work together, you’re well on your way to designing a robust and reliable base for your shed. For detailed assembly instructions and various design options, explore comprehensive wood shed floor plans.
Types of Wood Shed Floor Plans and Designs
Understanding the various types of wood shed floor plans and designs is crucial for matching your shed’s foundation to its intended use and size. From compact storage solutions to robust workshops, the floor design plays a pivotal role in stability and longevity.
Standard Floor Designs by Shed Size
- Small Sheds (e.g., 6×8, 8×10 feet): For smaller sheds, a simple skid foundation combined with a standard joist and plywood decking is often sufficient. Skids, typically pressure-treated 4x4s or 4x6s, run perpendicular to the floor joists and directly contact the ground (or gravel pad). This design is cost-effective and relatively easy to build, offering good stability for general storage. For instance, an 8×10 shed might use 2×6 joists spaced 16 inches on center, covered with 3/4-inch exterior-grade plywood.
- Medium Sheds (e.g., 10×12, 12×16 feet): As sheds increase in size, the floor design needs to accommodate greater spans and potential weight. A post-and-beam foundation becomes more common, where concrete piers or blocks support larger beams, which in turn support the floor joists. This elevates the shed, improving ventilation and moisture protection. For a 10×12 shed, you might opt for 2×8 joists on 12-inch or 16-inch centers, supported by 4×4 or 4×6 beams resting on concrete piers. This provides a more robust and level base.
- Large and Custom Sheds (e.g., 12×20, multi-room): Larger sheds, especially those intended for workshops, garages, or offices, demand a more substantial floor system. Often, these incorporate a full concrete slab foundation for maximum durability and weight-bearing capacity, with wood framing built directly on top of the slab. Alternatively, a heavily reinforced pier-and-beam system with larger lumber (e.g., 2×10 joists, 6×6 beams) and closer joist spacing (e.g., 12 inches on center) can be used. This is critical for supporting heavy machinery or vehicles.
Specialized Floor Designs
- Raised Floors: These designs are excellent for areas prone to moisture or uneven terrain. By elevating the shed floor on piers or posts, you ensure air circulation underneath, preventing rot and pest infestation. This design is versatile and can be adapted for various shed sizes, requiring careful planning for proper support and leveling.
- Heavy-Duty Floors: When your shed will house ATVs, lawn tractors, or heavy tools, a standard floor won’t cut it. Heavy-duty designs typically involve:
- Closer Joist Spacing: Reducing the distance between floor joists (e.g., 12 inches or even 8 inches on center) significantly increases load capacity.
- Thicker Decking: Using 7/8-inch or 1-inch exterior-grade plywood, or even two layers of 3/4-inch plywood, provides a much stronger surface.
- Larger Lumber: Upgrading joist and beam dimensions (e.g., 2×10 joists instead of 2×6) for increased strength and stiffness.
- Reinforced Foundations: Ensuring the underlying foundation (skids, piers, or slab) can handle the concentrated weight.
Choosing the right floor plan involves assessing your shed’s size, intended contents, local climate, and budget. For detailed construction guides and customizable options, explore comprehensive wood shed floor plans that cater to various needs.
Choosing the Right Shed Foundation for Your Wood Floor
Selecting the appropriate foundation is paramount to the longevity and stability of your wood shed floor. The foundation acts as the bridge between your shed and the ground, protecting the wood from moisture, pests, and shifting soil. Your choice will significantly impact the shed’s overall durability and maintenance requirements.
Common Shed Foundation Types
There are several popular foundation types, each with distinct advantages and ideal applications:
- Skid Foundations (Runners/Skids): These are essentially pressure-treated timbers (e.g., 4x4s or 4x6s) laid directly on a prepared, level gravel bed.
- Pros: Highly portable, cost-effective, excellent drainage when combined with gravel.
- Cons: Not suitable for very large or heavy sheds; can settle unevenly over time if the ground isn’t properly prepared.
- Best for: Small to medium-sized sheds, temporary structures, or areas where portability is desired.
- Example: A 8×10 garden shed placed on three 4×6 pressure-treated skids running lengthwise, elevated by a 4-inch gravel bed.
- Concrete Slab Foundations: A solid, reinforced concrete pad poured directly on a prepared site.
- Pros: Extremely durable, provides a perfectly level base, excellent pest and moisture barrier, ideal for heavy equipment.
- Cons: Most expensive option, permanent, requires professional pouring or significant DIY effort, poor drainage if not sloped correctly.
- Best for: Large, heavy sheds (e.g., workshop sheds, carports), areas with high moisture, or when maximum stability is desired.
- Example: A 12×20 workshop shed requiring a 4-inch thick concrete slab with wire mesh reinforcement.
- Pier and Beam Foundations (Post and Beam): Consists of concrete piers (sono tubes, pre-cast blocks) sunk into the ground below the frost line, supporting a framework of beams on which the shed floor joists rest.
- Pros: Allows excellent airflow beneath the shed, easy to level on uneven terrain, good moisture protection.
- Cons: More complex to build than skids, requires digging and precise leveling of piers.
- Best for: Sloping sites, areas prone to flooding, or when significant ventilation under the shed is crucial.
- Example: A shed built on a hillside, using concrete piers set at varying depths to create a level plane for the shed floor.
Factors Influencing Your Decision
When choosing, consider these critical elements:
- Soil Type & Drainage:
- Clay soil: Retains water, requires excellent drainage solutions like gravel beds or elevating the shed with piers.
- Sandy soil: Drains well, but can shift, so a wider base like a slab or larger footings for piers is beneficial.
- Climate:
- Frost heave: In cold climates, foundations must extend below the frost line (pier and beam) or be significantly reinforced (slab) to prevent damage.
- High rainfall: Prioritize foundations that elevate the shed and ensure excellent drainage.
- Shed Size & Weight:
- Small, light sheds: Skids are often sufficient.
- Large, heavy sheds (e.g., filled with tools, riding mower): Demand the robust support of a concrete slab or well-engineered pier and beam system.
- Budget & DIY Skill Level:
- Skids are the most budget-friendly and DIY-friendly.
- Concrete slabs are the most expensive and often require professional help.
- Pier and beam falls in between, requiring more precision than skids.
Ultimately, the best foundation for your wood shed floor will balance these factors, ensuring a stable, dry, and long-lasting base for your structure. For detailed instructions and diagrams on constructing various foundation types, explore comprehensive wood shed floor plans.
Step-by-Step Guide: Building Your Wood Shed Floor
Building a robust wood shed floor is a critical step for any shed project. This guide will walk you through the process, ensuring a durable and long-lasting base for your structure.
1. Preparing the Site and Laying the Foundation
Before any construction begins, proper site preparation is paramount.
- Clear the Area: Remove all vegetation, rocks, and debris from the shed footprint, extending at least 1-2 feet beyond the proposed shed dimensions.
- Level the Ground: Use a level and a straight edge to ensure the ground is as flat as possible. For minor discrepancies, you can use a tamper to compact high spots or add compacted gravel to low areas. For significant slopes, consider excavating or building up with a gravel pad.
- Install Foundation: Depending on your chosen foundation type (skids, concrete blocks, piers), install these according to your design. For example, if using concrete blocks, place them firmly on the leveled ground, ensuring they are perfectly level with each other across the entire shed footprint. Use shims if necessary.
2. Constructing the Shed Floor Framing
The framing forms the skeleton of your floor, providing structural integrity.
- Cut Lumber: Based on your chosen wood shed floor plans, cut your pressure-treated 2×6 or 2×8 lumber for the rim joists and floor joists. Pressure-treated wood is essential for ground contact or areas prone to moisture.
- Assemble the Frame:
- Lay out the two longest rim joists parallel to each other.
- Position the shorter rim joists (or end joists) between them at each end, forming a rectangle.
- Secure these corners using 3-inch exterior-grade screws or galvanized nails, ensuring the frame is square by measuring diagonals – they should be equal.
- Install Floor Joists: Place the floor joists between the rim joists, typically spaced 16 or 24 inches on center, as dictated by your plans. Use joist hangers for secure connections to the rim joists, fastening them with appropriate hanger nails. Ensure all joists are flush with the top of the rim joists.
- Add Blocking/Bridging (Optional but Recommended): Install short pieces of lumber (blocking) between joists at mid-spans, especially for larger sheds, to prevent twisting and provide additional rigidity.
3. Installing the Subfloor and Protecting the Underside
The subfloor provides the walking surface and ties the framing together.
- Lay Subfloor Panels: Use ¾-inch exterior-grade plywood or OSB for the subfloor. Start at one corner, aligning the edges precisely with the rim joists. Apply a generous bead of construction adhesive to the top of the floor joists before laying each panel.
- Fasten Panels: Secure the subfloor panels to the joists and rim joists using 2-inch or 2.5-inch exterior-grade screws or ring-shank nails, spaced every 6 inches along the edges and every 12 inches in the field. Stagger the seams of subsequent rows for added strength. Leave a ⅛-inch expansion gap between panels.
- Protect the Underside: To enhance longevity, especially for sheds directly on the ground or in damp areas, consider these protections:
- Vapor Barrier: Staple a heavy-duty plastic sheeting (6-mil polyethylene) to the underside of the joists before installing the subfloor. This prevents moisture from wicking up from the ground.
- Insect Screen: For sheds with open foundations (like piers), staple hardware cloth or metal screening around the perimeter of the foundation to deter rodents and insects from nesting under the shed.
- Gravel Base: Ensure your foundation includes a well-drained gravel base to prevent standing water under the shed.
By following these steps, you’ll create a solid, level, and durable wood shed floor that will support your shed for years to come. For detailed diagrams and specific measurements, explore various wood shed floor plans.
Essential Tools and Materials for Your Shed Floor Project
Building a robust shed floor requires the right arsenal of tools and carefully selected materials. Investing in quality from the outset will save time, frustration, and ensure the longevity of your shed’s foundation.
Essential Tools for Construction
Having the correct tools readily available makes the building process smoother and safer. Here’s a breakdown of what you’ll typically need:
- Measuring & Marking:
- Tape Measure: A 25-foot or 30-foot tape measure is crucial for accurate dimensioning.
- Pencil/Marker: For marking cuts and layout lines.
- Speed Square/Framing Square: Essential for ensuring 90-degree angles and straight cuts.
- Chalk Line: For snapping long, straight lines on larger pieces of lumber or foundations.
- Cutting:
- Circular Saw: Your primary tool for cutting lumber to size. A good quality saw with a sharp blade is indispensable.
- Miter Saw (Optional but Recommended): Offers precise crosscuts and angle cuts, especially useful for joists and rim joists.
- Jigsaw: Handy for cutting curves or making intricate cuts, though less critical for a basic floor.
- Fastening:
- Cordless Drill/Driver: Absolutely essential for driving screws and drilling pilot holes. Have spare charged batteries.
- Impact Driver (Recommended): Offers more torque for driving long screws into dense lumber, reducing strain on your drill.
- Hammer: For occasional nailing or adjusting components.
- Leveling & Squaring:
- Spirit Level (2-foot and 4-foot): Critical for ensuring your foundation and floor joists are perfectly level.
- String Line & Line Level: Useful for establishing level lines over longer distances, particularly for foundation piers.
- Safety Gear:
- Safety Glasses: Non-negotiable for protecting your eyes from flying debris.
- Work Gloves: To protect hands from splinters and rough materials.
- Ear Protection: Especially when using power tools for extended periods.
Key Materials for a Durable Shed Floor
The materials you choose directly impact the strength and lifespan of your shed floor. Opt for pressure-treated lumber for any components that will be in contact with the ground or exposed to moisture.
- Lumber:
- Pressure-Treated (PT) Skids/Runners: Typically 4×4 or 6×6, these are the base members that rest directly on the ground or foundation blocks. They must be ground-contact rated.
- Pressure-Treated (PT) Floor Joists: Often 2×4, 2×6, or 2×8, depending on shed size and span. These form the primary structural support for the decking.
- Pressure-Treated (PT) Rim Joists/Band Boards: Used to cap the ends of the floor joists, creating a strong perimeter.
- Decking/Sheathing:
- Plywood (Exterior Grade or Marine Grade): Minimum 3/4-inch thick, rated for exterior use (like CDX or better). This forms the actual walking surface.
- OSB (Oriented Strand Board, Exterior Grade): A more economical option than plywood, also typically 3/4-inch thick and exterior rated. Ensure it’s rated for flooring.
- Fasteners:
- Deck Screws (Exterior Grade): Galvanized or coated screws, usually 2.5-inch to 3-inch, for securing joists and decking. Avoid drywall screws as they are not designed for structural outdoor use.
- Construction Adhesive (Optional but Recommended): Applying a bead of subfloor adhesive to joists before laying decking reduces squeaks and adds strength.
- Foundation Materials (if applicable):
- Concrete Blocks/Piers: For supporting the skids and leveling the floor.
- Gravel/Crushed Stone: For creating a well-drained base under the foundation blocks.
When sourcing materials, consider buying from reputable lumber yards rather than just big box stores, as they often have higher quality lumber and better selection, especially for pressure-treated options. For comprehensive guidance on structural design and material quantities, explore detailed wood shed floor plans.
Permits, Building Codes, and Safety Considerations
Building a shed, even a small one, is a construction project that can be subject to local regulations. Ignoring these can lead to costly delays, fines, or even the forced demolition of your structure. Therefore, understanding permits, building codes, and safety is paramount.
Navigating Permits and Building Codes
Before you even purchase your first piece of lumber, it’s crucial to investigate your local jurisdiction’s requirements. These regulations vary significantly between municipalities, counties, and even within different zones of the same city.
- When is a Permit Required? Generally, permits are needed for structures exceeding a certain footprint (e.g., 100-200 sq ft) or height (e.g., 8-10 ft). Some areas require permits for any permanent structure. Factors like electrical wiring, plumbing, or connection to utilities almost always necessitate a permit.
Example: A 10×12 shed might require a permit in one town, while an 8×10 shed in a neighboring town might not.
- Building Codes: These codes specify minimum standards for structural integrity, fire safety, and health. For your shed floor, this might include:
- Foundation Requirements: Specific depth for footings, type of foundation (skids, concrete slab, pier and beam).
- Material Specifications: Minimum lumber dimensions for joists and beams, appropriate treated lumber for ground contact.
- Anchoring: How the shed must be anchored to its foundation, especially in areas prone to high winds.
- How to Check:
- Visit your local planning or building department website. Many have dedicated sections for accessory structures like sheds.
- Call or visit in person. Staff can clarify ambiguities and provide specific guidelines.
- Homeowners’ Associations (HOAs): If you live in an HOA, they often have additional restrictions on shed size, placement, and appearance. Always check their covenants.
Prioritizing Safety During Construction
Building a shed floor involves working with heavy materials, power tools, and potentially at heights. Adhering to safety protocols is non-negotiable to prevent injuries.
- Personal Protective Equipment (PPE):
- Safety Glasses: Essential to protect your eyes from sawdust, flying debris, and tool kickback.
- Work Gloves: Protect hands from splinters, cuts, and blisters.
- Hearing Protection: Crucial when operating loud power tools like circular saws or miter saws.
- Steel-Toe Boots: Guard against falling objects and punctures.
- Tool Safety:
- Read Manuals: Understand how to operate all power tools safely.
- Unplug When Not in Use: Prevents accidental activation during adjustments or blade changes.
- Maintain Sharp Blades: Dull blades can bind, leading to kickback.
- Stable Work Surface: Ensure all materials are securely clamped or supported before cutting.
- Lifting and Ergonomics:
- Lift with Your Legs: Bend your knees and keep your back straight when lifting heavy lumber or concrete bags.
- Get Help: Don’t hesitate to ask for assistance when moving large or heavy components.
- Site Organization: Keep your work area clear of debris, tools, and tripping hazards. A tidy site is a safe site.
By thoroughly researching local regulations and committing to safe building practices, you can ensure your shed project proceeds smoothly and legally. For comprehensive guides and detailed construction plans, explore various wood shed floor plans that often include insights into these critical considerations.
Cost Estimation and Time Commitment for Different Plans
Understanding the financial and temporal investment required for your wood shed floor is crucial for a successful project. Costs and time commitments vary significantly based on the complexity of your chosen floor plan, material selections, and your personal building experience.
Material Cost Breakdown
Material costs are typically the largest variable. Here’s a general breakdown:
- Basic Skids/Blocks: For a simple 6×8 shed using treated lumber skids directly on the ground, expect to pay $100-$300 for the skids, joists, and basic plywood decking. This is the most budget-friendly option.
- Elevated Post and Beam: A more robust 8×10 shed utilizing concrete piers, treated posts, and a full joist system with ¾-inch treated plywood can range from $400-$800. This offers better ventilation and durability.
- Concrete Slab (as subfloor): While not a “wood floor plan” in itself, a concrete slab often serves as a base. For a 10×12 slab, expect $800-$1500 for materials (concrete mix, rebar, forms) if DIY, or significantly more if professionally installed. The wood floor would then sit on top.
- Premium Materials: Opting for composite decking, marine-grade plywood, or specialized moisture barriers will push costs higher, potentially adding 20-50% to the material budget.
Tip: Always factor in an additional 10-15% for unforeseen expenses like extra fasteners, tool rentals, or material delivery fees.
Estimating Time Investment
The time commitment is equally diverse, influenced by your skill level and the complexity of the floor plan.
- Beginner-Friendly Plans (Skid Foundation): For a small (e.g., 6×8) shed floor built on skids, a novice DIYer might complete the framing and decking in 1-2 full days. An experienced builder could finish it in half a day.
- Intermediate Plans (Elevated Joist System): An 8×10 elevated floor with concrete piers and a framed joist system could take a DIYer 2-4 full days. This includes digging, pouring concrete (with curing time), and framing.
- Advanced Plans (Large, Complex Designs): For larger sheds (10×12 or more) with intricate framing, multiple levels, or specific load-bearing requirements, expect 4-7 days or more of dedicated work. This often involves more precise measurements, cutting, and assembly.
Recommendation: Don’t underestimate preparation time. Gathering tools, clearing the site, and organizing materials can add several hours to your project timeline.
For comprehensive resources and detailed guides to help you plan your budget and timeline, explore various wood shed floor plans that often include material lists and estimated build times.
Optimizing Your Shed Floor for Durability and Use
Optimizing your shed floor goes beyond initial construction; it’s about ensuring its longevity and functionality. A well-optimized floor resists the elements, deters pests, and remains steadfast for years of heavy use.
Protecting Against Moisture and Enhancing Airflow
Moisture is the primary enemy of any wood structure. Proper protection and ventilation are crucial to prevent rot, mold, and warping.
- Moisture Barriers: Install a robust moisture barrier directly beneath your shed floor joists, especially if your shed is built close to the ground. This could be a heavy-duty polyethylene sheeting (6-mil or thicker) that extends beyond the foundation perimeter. For example, if your shed sits on concrete blocks, drape the sheeting over the blocks and up the sides of the joists before attaching the subfloor.
- Vapor Retarders: On the top side of the subfloor, before installing any finished flooring, consider a vapor retarder. This is particularly important for sheds storing sensitive items or those with climate control. A red rosin paper or a specialized flooring underlayment can serve this purpose.
- Ventilation: Adequate airflow beneath the shed is paramount.
- Foundation Vents: If using a perimeter foundation (e.g., concrete block or continuous concrete), incorporate screened foundation vents on at least two opposing sides. A good rule of thumb is 1 square foot of vent opening for every 150 square feet of crawl space area, with half placed near each end.
- Elevated Foundations: For sheds built on skids or piers, ensure the elevation is sufficient (at least 6-12 inches) to allow air to circulate freely underneath, preventing moisture buildup.
Pest Prevention Strategies
Wood sheds are attractive targets for insects and rodents. Proactive measures can keep your floor intact and your stored items safe.
- Treated Lumber: Always use pressure-treated lumber for any components that will be in contact with the ground or are close to it (skids, rim joists, floor joists). This lumber is infused with chemicals that resist rot and insect infestation.
- Physical Barriers:
- Hardware Cloth: Staple ¼-inch galvanized hardware cloth around the perimeter of your shed foundation, extending it from the ground up to the bottom of the floor decking. This creates an effective barrier against rodents, snakes, and larger insects. Ensure there are no gaps for entry.
- Seal Gaps: Carefully seal any gaps or cracks in the floor or foundation with caulk or expanding foam. Even small openings can become entry points for pests.
- Regular Inspections: Periodically inspect the perimeter and underside of your shed for signs of pest activity, such as gnaw marks, droppings, or insect trails. Address any issues promptly.
Maintenance for Lasting Performance
Even the most durable floor requires some upkeep to withstand the test of time and use.
- Keep it Clean: Regularly sweep out dirt, debris, and standing water. Accumulated organic matter can hold moisture and attract pests.
- Address Spills Immediately: For sheds storing chemicals, paints, or other liquids, clean up spills immediately to prevent staining and potential damage to the wood. Consider using floor sealants or epoxy coatings for heavy-duty use areas.
- Check for Damage: Annually inspect your floor for signs of wear, rot, or insect damage. Look for soft spots, discoloration, or bowing. Promptly repair or replace damaged sections to prevent further deterioration.
- Reapply Protection: If your floor has a protective coating or sealant, reapply it as recommended by the manufacturer, typically every few years, to maintain its protective qualities.
By implementing these optimization strategies, you’ll significantly enhance the durability and usability of your shed floor, ensuring it serves your needs for many years to come. For detailed construction guides and optimized designs, explore various wood shed floor plans.
Wood Shed Floor Plans: Free vs. Premium Options
When embarking on a shed building project, one of the first decisions you’ll face is where to source your wood shed floor plans. The internet offers a vast array of options, broadly categorized into free and premium offerings, each with distinct advantages and disadvantages.
Free Wood Shed Floor Plans
Free plans are readily available from various sources, including DIY blogs, government agricultural sites, and even some lumber supplier websites.
- Advantages:
- Cost-effective: The most obvious benefit is that they cost nothing, making them attractive for budget-conscious builders.
- Quick access: You can often download them instantly, allowing you to start planning immediately.
- Good for simple projects: For very basic, small sheds with straightforward designs, free plans can provide a decent starting point.
- Examples: A simple 6×8 utility shed floor plan found on a local extension office website, detailing basic joist spacing and perimeter framing.
- Disadvantages:
- Lack of detail: Free plans frequently lack comprehensive instructions, material lists, and cut sheets. This can lead to guesswork, material waste, and construction errors.
- Inaccurate or outdated: Information might be old, not compliant with current building codes, or contain errors that could compromise the shed’s structural integrity.
- Limited support: If you encounter a problem or have a question, there’s usually no one to turn to for assistance.
- Generic designs: They often don’t account for specific site conditions, local climate, or unique aesthetic preferences.
Premium Wood Shed Floor Plans
Premium plans, typically purchased from specialized plan providers or professional designers, offer a more robust and reliable foundation for your build.
- Advantages:
- Comprehensive detail: These plans include exhaustive material lists, precise cut sheets, step-by-step illustrated instructions, and often 3D renderings. This minimizes errors and maximizes efficiency.
- Structural integrity: Designed by experienced professionals, premium plans prioritize durability, load-bearing capacity, and adherence to common building standards. For instance, they’ll specify appropriate lumber grades and fastener types for your specific shed size.
- Customer support: Many premium plan providers offer dedicated customer support to answer questions and troubleshoot issues during your build.
- Customization options: While not always fully customizable, premium plans often come with variations or suggestions for adapting them to your needs, like adding a sloped floor for drainage.
- Examples: A detailed 10×12 gambrel shed plan with annotated diagrams showing exact bolt placement for anchor points and specific foundation requirements.
- Recommendation: While free plans can be tempting, for a durable and long-lasting shed, especially for larger or more complex structures, investing in premium plans is highly recommended. The peace of mind, time saved, and reduced material waste often far outweigh the initial cost.
To explore a wide selection of detailed and reliable wood shed floor plans, consider professional resources that cater to various shed sizes and designs.
Conclusion: Building a Solid Foundation for Your Shed Project
As we conclude our comprehensive guide to building a durable wood shed floor, it’s clear that the foundation of your shed is more than just a base – it’s the bedrock of its longevity and functionality. We’ve explored the critical components, diverse designs, and essential steps to ensure your shed stands strong against the elements and the test of time.
Key Takeaways for a Robust Shed Floor
Throughout this article, several crucial themes have emerged, emphasizing the importance of informed decision-making and meticulous execution:
- Durability Starts Below: A strong wood shed floor is paramount for protecting your stored items from moisture, pests, and rot. Ignoring this foundational element can lead to premature structural failure and costly repairs.
- Understanding Components is Key: From joists and blocking to decking and fasteners, each part plays a vital role. For instance, using pressure-treated lumber for ground contact elements like skids and joists is non-negotiable for resisting decay and insect infestation.
- Foundation Matters: The choice between a concrete slab, gravel pad, or concrete piers directly impacts your floor’s stability and drainage. A well-prepared gravel pad, for example, offers excellent drainage, preventing water accumulation under your shed.
- Planning Prevents Problems: Thorough planning, including permits and building codes, ensures your project is compliant and safe. Sketching out your floor plan helps visualize the layout and identify potential issues before construction begins.
- Invest in Quality: Skimping on materials or tools can compromise the integrity of your floor. High-quality treated lumber, galvanized fasteners, and appropriate tools like a circular saw and level will contribute to a professional and lasting result.
Empowering Your DIY Shed Project
Embarking on a shed floor build is a rewarding DIY project that empowers you with practical skills and a tangible achievement. While it may seem daunting at first, breaking it down into manageable steps, as outlined in our guide, makes the process achievable for even novice builders.
- Embrace the Process: Don’t rush. Take your time with measurements, cuts, and leveling. A perfectly square and level foundation is the secret to a shed that assembles easily and lasts for decades.
- Safety First: Always prioritize safety. Wear appropriate personal protective equipment (PPE) like safety glasses and gloves, and ensure you understand how to safely operate all tools.
- Learn and Adapt: Every project presents learning opportunities. If you encounter a challenge, research solutions, consult experienced builders, or revisit relevant sections of this guide.
By diligently applying the knowledge and recommendations shared here, you are well-equipped to construct a solid, level, and long-lasting wood shed floor. This robust base will not only support your shed’s structure but also safeguard its contents for years to come, turning your storage solution into a durable asset. For detailed blueprints and step-by-step instructions to bring your shed vision to life, explore our comprehensive collection of wood shed floor plans.
Frequently Asked Questions About Wood Shed Floor Plans
Why is a strong wood shed floor so important?
A strong wood shed floor is crucial because it bears the significant weight of stored items, tools, and equipment, preventing sagging, warping, or cracking that could compromise the entire shed’s structure. It also acts as a vital barrier against moisture from the ground, which can lead to wood rot, mold, and corrosion, and prevents pests like rodents and insects from entering. Moreover, a well-built floor ensures the shed’s longevity, reduces maintenance needs, adds property value, and provides a safe, level surface for working or storage, enhancing overall usability.
What are the main problems if I ignore the importance of a well-built shed floor?
Ignoring a well-built shed floor can lead to several problems. Firstly, the floor may sag, warp, or crack under the weight of items, compromising the shed’s structural integrity. Secondly, it can allow ground moisture to seep into the shed, causing wood rot, mold, mildew, and corrosion of metal tools. Thirdly, weak points or gaps in the floor can become entry points for pests like rodents and insects. Lastly, an unstable and uneven floor poses safety hazards, increasing the risk of trips and falls, and reduces the shed’s overall lifespan and value.
How does a proper shed floor protect against moisture and pests?
A proper shed floor protects against moisture and pests by creating a critical barrier between the shed’s interior and the ground. The ground is a constant source of dampness, and an inadequate floor would allow this moisture to infiltrate, leading to wood rot, mold, and corrosion. A well-sealed and often elevated floor prevents this seepage. For pests, gaps or weak points in an inferior floor offer easy access. A properly constructed and sealed floor eliminates these entry points, acting as a deterrent for rodents, insects, and other unwanted creatures seeking shelter.
What benefits do stability and a level surface provide for a shed floor?
Stability and a level surface for a shed floor offer significant benefits for both safety and usability. A stable, level floor is essential for preventing trips and falls, ensuring a safer environment for anyone using the shed. For those using the shed as a workshop, a firm and level base provides crucial stability for tools and machinery, improving efficiency and safe operation. Furthermore, it allows for proper installation of shelving and workbenches, ensuring they remain sturdy and functional, thereby enhancing the overall practical utility of the shed.


