
Dreaming of a dedicated space for your gardening tools, a cozy potting shed, or just some extra backyard storage? Building your own garden shed can be an incredibly rewarding and cost-effective project. Forget expensive kits or hiring contractors; with the right guidance, even those with basic carpentry skills can construct a sturdy, beautiful shed that perfectly fits their needs and aesthetic. This comprehensive guide is your ultimate resource for DIY garden shed plans, offering free, easy-to-follow blueprints and detailed instructions to take you from initial concept to a fully functional backyard oasis. We’ll cover everything from choosing the right style and size to essential tools, step-by-step construction, and even long-term maintenance. Get ready to roll up your sleeves and build the backyard shed you’ve always wanted!
Choosing Your Perfect Garden Shed: Styles, Sizes, and Foundations
Before you pick up a single tool, laying the groundwork for your DIY shed project begins with thoughtful planning. This crucial first step involves understanding your specific needs, assessing your available space, and making informed decisions about the shed’s style, size, and foundation. Ask yourself: What will this shed primarily be used for? Is it for gardening tools, a dedicated workshop, overflow storage, or perhaps a creative retreat? Your answer will guide every subsequent choice.
Choosing the Right Shed Style
The architectural style of your shed impacts both its appearance and functionality.
- Gable Sheds: The classic choice, featuring a traditional peaked roof. These are highly versatile, offer excellent headroom, and are effective at shedding rain and snow. Ideal for general storage or workshops.
- Gambrel (Barn) Sheds: Recognized by their distinctive barn-like roof, which creates a significant amount of overhead space. Perfect for maximizing vertical storage or adding a loft.
- Lean-to Sheds: Designed to attach to an existing structure (like your house or garage). They save space and materials, making them a great option for smaller yards or when you need an extension of current storage.
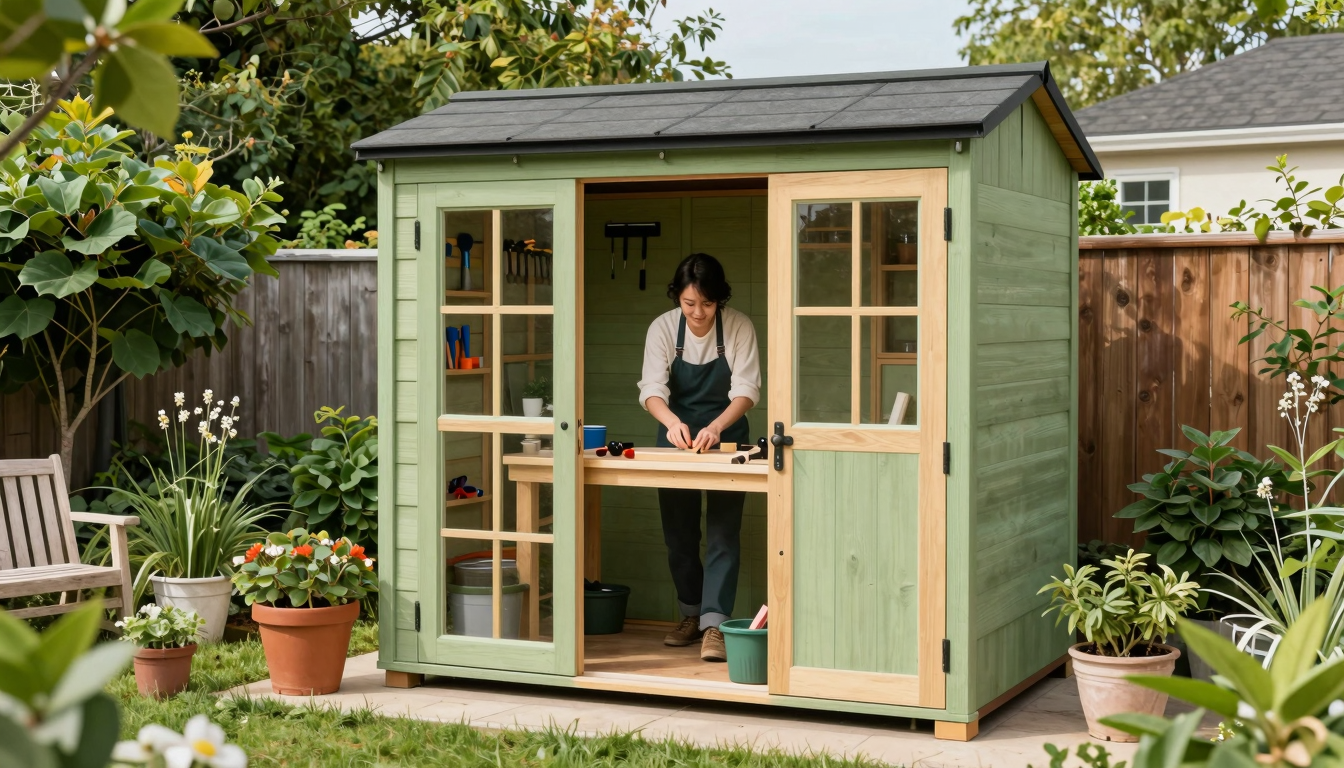
- Potting Sheds: Often feature abundant windows, a workbench, and integrated shelving, specifically tailored for gardening enthusiasts. They provide a dedicated space for planting and tending.
Determining the Perfect Size
Shed size is dictated by its intended use and the spatial constraints of your backyard.
- Small (e.g., 6×8 ft): Ideal for basic tool storage, lawnmowers, and gardening supplies. For smaller spaces, consider Small Garden Shed Plans.
- Medium (e.g., 8×10 ft to 10×12 ft): Suitable for general storage, a small workbench, or housing bulkier items like bicycles or ATVs. Check out Free 10×12 Shed Plans for detailed guides.
- Large (e.g., 12×16 ft and up): Best for dedicated workshops, extensive storage, or even a home office. Explore Large Garden Shed Plans for spacious options.
Tip: Always measure your available yard space meticulously. Factor in local zoning laws regarding setbacks from property lines and other structures. Don’t forget to account for door swing and adequate clearance around the shed for maintenance and access. You might also need to consider Planning Permission for Sheds.
Selecting a Solid Foundation
A robust foundation is critical for your shed’s stability, longevity, and protection from moisture and pests.
- Skid Foundation: A cost-effective and relatively simple option for smaller sheds. Pressure-treated skids rest directly on the ground or a gravel bed, allowing for some portability.
- Gravel Pad Foundation: A layer of compacted gravel provides excellent drainage and a level surface. Often used in conjunction with skids or a treated wood perimeter.
- Concrete Pier Foundation: Involves pouring concrete piers, typically below the frost line, with the shed floor joists resting on top. Excellent for sloped terrain or when you want to keep the shed elevated off the ground.
- Concrete Slab Foundation: The most durable and permanent choice, providing a completely level, moisture-resistant, and rodent-proof base. Ideal for larger, heavier sheds and workshops, though it requires more labor and materials.
Choosing the right foundation depends on your shed’s size, local climate (especially frost lines), and soil conditions. For comprehensive, free blueprints and detailed instructions to guide you through every step of building your dream shed, explore our garden shed plans diy.
Essential Tools and Materials: What You’ll Need for Your DIY Shed
Building your own garden shed is a rewarding project, but it begins long before the first nail is driven. A well-prepared workspace with all the necessary tools and materials on hand will save you invaluable time and prevent frustrating delays. While specific requirements will vary with your chosen shed design and size, this comprehensive guide covers the essential items you’ll need to transform your backyard vision into reality.
Essential Tools for Your Shed Construction
Having the right tools is crucial for efficiency and safety. Here’s a breakdown of what you’ll likely require:
- Measuring & Marking:
- Tape Measure: A 25-foot tape measure is indispensable for accurate measurements.
- Carpenter’s Square: For ensuring perfect 90-degree angles in framing.
- Chalk Line: To mark long, straight lines on plywood or framing.
- Pencil: For marking cuts and drilling points.
- Cutting:
- Circular Saw: Your primary tool for cutting dimensional lumber and sheet goods like plywood or OSB.
- Miter Saw (Chop Saw): Highly recommended for precise, repeatable crosscuts on framing and trim.
- Jigsaw: Useful for intricate cuts, curves, or cutting out window/door openings.
- Handsaw: Handy for quick, small cuts where a power saw isn’t feasible.
- Drilling & Fastening:
- Cordless Drill/Driver: A powerful 18V or 20V model is essential for drilling pilot holes and driving screws. Have a variety of drill bits (wood, metal) and driver bits (Phillips, Torx, square drive).
- Impact Driver: While optional, an impact driver makes driving long screws into tough lumber much easier and faster, reducing strain on your wrist.
- Hammer: For nailing, prying, and general adjustments.
- Nail Gun (Framing and Roofing): A huge time-saver for repetitive tasks. Consider renting one if you don’t anticipate frequent use.
- Leveling:
- Spirit Levels: A 2-foot and a 4-foot level are critical for ensuring your foundation, walls, and roof are perfectly plumb and level.
- String Line & Line Level: For checking long spans and ensuring consistency across distances.
- Safety Gear: Never compromise on safety!
- Safety Glasses: Protect your eyes from flying debris.
- Work Gloves: Prevent splinters, cuts, and enhance grip.
- Ear Protection: Essential when using power tools for extended periods.
- Dust Mask/Respirator: Especially when cutting wood or working with insulation.
- Miscellaneous:
- Utility Knife: For cutting roofing felt, flashing, or opening packages.
- Pry Bar: For demolition, straightening warped boards, or removing misplaced nails.
- Caulk Gun: For applying sealants and adhesives.
- Clamps: To hold pieces together while fastening or gluing.
- Step Ladder/Extension Ladder: Depending on your shed’s height.
Key Materials for Your DIY Shed
Your material list will be detailed in your chosen plans, but here’s a general overview of the categories:
- Lumber:
- Pressure-Treated Lumber: Absolutely essential for any wood in contact with the ground, such as foundation skids and floor joists, to prevent rot and insect damage.
- Dimensional Lumber: Typically 2x4s, 2x6s, or 2x8s for framing walls, roof rafters, and floor joists.
- Plywood or OSB (Oriented Strand Board): Used for floor decking, wall sheathing, and roof sheathing. Choose appropriate thicknesses for each application.
- Siding:
- T1-11 Plywood Siding: A popular, cost-effective option that provides both sheathing and exterior finish.
- Vinyl Siding, Wood Lap Siding, or Cedar Shingles: Offer various aesthetic and durability options.
- Roofing:
- Asphalt Shingles: Common, durable, and relatively easy to install. Don’t forget roofing felt (underlayment), drip edge, and roofing nails.
- Metal Roofing or Corrugated Panels: Offer different looks and potentially longer lifespans.
- Fasteners:
- Exterior-Grade Screws: Various lengths for framing, attaching siding, and general construction. Ensure they are corrosion-resistant.
- Galvanized Nails: For framing, sheathing, and roofing.
- Joist Hangers: If your plans specify them for floor or roof framing, ensure you have the correct size and type.
- Hardware:
- Door Hinges & Latch/Handle: Choose sturdy, weather-resistant options.
- Window Hardware: If your shed includes windows.
- Hurricane Ties/Connectors: Recommended for areas prone to high winds, these strengthen the connection between walls and the roof.
- Finishing:
- Exterior Paint or Stain: To protect your shed from the elements and enhance its appearance.
- Caulk/Sealant: For sealing gaps and joints to prevent water intrusion.
- Trim Boards: For finishing corners, windows, and doors.
- Flashing: Metal or vinyl strips installed around windows, doors, and roof transitions to direct water away.
Always consult your specific DIY Storage Shed Plans for a precise and detailed list of materials and quantities. It’s a good practice to purchase a small amount extra of each material to account for miscuts or unexpected needs.
Step-by-Step Construction Guide: Building Your Garden Shed from the Ground Up
With your chosen design, materials gathered, and tools prepped, it’s time to bring your garden shed to life! This step-by-step guide walks you through the essential stages of construction. Always refer to your specific blueprints for precise measurements and techniques.
Laying the Foundation and Building the Base
1. Site Preparation and Foundation:
Begin by clearing your chosen area of any debris, rocks, or vegetation. Level the ground meticulously – this is crucial for a stable shed. Install your foundation according to your plan, whether it’s a simple skid foundation (using pressure-treated timbers directly on the ground for portability), a gravel pad (offering excellent drainage), or a more permanent concrete slab or pier foundation. Ensure it’s perfectly level and square using a long spirit level and a builder’s square.
2. Floor Frame and Decking:
Construct the floor frame using pressure-treated lumber (e.g., 2x6s or 2x8s) for joists. Secure these to your foundation and each other with exterior-grade screws or galvanized nails, utilizing joist hangers for robust connections. Once the frame is complete, attach the floor decking (typically 3/4-inch exterior-grade plywood or OSB) using 2-inch exterior screws spaced every 6 inches along the joists. Remember to leave small 1/8-inch gaps between panels for expansion and contraction.
Framing the Structure and Roof
3. Wall Framing:
This is where your shed starts to take shape! Assemble each wall section (front, back, and sides) flat on your prepared floor. Cut your wall studs, top plates, and bottom plates to the exact lengths specified in your blueprints. Frame out all door and window openings with headers (horizontal supports above openings) and cripple studs (short studs below windows or above headers). Once each wall is built, carefully stand them up, brace them temporarily with diagonal supports, and secure them to the floor frame and to each other at the corners using long structural screws or nails. Double-check that all walls are plumb (perfectly vertical) and square.
4. Roof Structure:
The roof is often the most challenging part, requiring precision. Construct your rafters or trusses according to your plans, ensuring all angles and lengths are accurate. Lift and install these onto the top plates of your framed walls, securing them with hurricane ties or similar structural fasteners. Add blocking between rafters for increased rigidity and to provide nailing surfaces for your roof sheathing.
Finishing Touches and Weatherproofing
5. Sheathing and Siding:
Cover your roof rafters with 1/2-inch or 5/8-inch plywood or OSB sheathing, leaving small expansion gaps. For the walls, install your chosen siding material – be it T1-11, clapboard, or panel siding – starting from the bottom and working your way up. Ensure proper overlap for weather resistance and secure fastening according to the material’s specifications.
6. Roofing Installation:
Apply a layer of roofing felt or synthetic underlayment over the roof sheathing, overlapping according to manufacturer instructions. Install drip edge along the eaves (bottom edges) and rake edges (sloping sides) to direct water away. Finally, install your chosen roofing material, such as asphalt shingles or metal panels, following the manufacturer’s specific guidelines for proper overlap and fastening.
7. Doors and Windows:
Carefully hang your door(s) in the framed openings, ensuring they swing freely and latch securely. Install your windows, making sure they are level and plumb. Crucially, install appropriate flashing around all door and window openings to prevent water intrusion.
8. Trim and Sealing:
Add decorative and protective trim elements like corner boards, fascia boards (along the roof edges), and soffit panels. Caulk all exterior seams, gaps, and around window/door frames with a high-quality exterior sealant to make your shed truly weatherproof.
By meticulously following these steps and your specific blueprints, you’ll be well on your way to a sturdy and functional garden shed. For a wide selection of detailed and easy-to-follow blueprints, check out these garden shed plans diy.
Customizing and Finishing Your Shed: Personal Touches and Practical Additions
Once the structural integrity of your DIY garden shed is established, the exciting phase of personalization begins. This is where your shed transcends its basic function, becoming a tailored extension of your outdoor living space. Thoughtful customization and finishing touches not only enhance its aesthetics but also significantly improve its utility and longevity.
Exterior Enhancements and Curb Appeal
The exterior of your shed is the first impression, so make it count.
- Paint or Stain: Choose a color that complements your home or blends harmoniously with your garden’s palette. Lighter shades can make a smaller shed appear more spacious, while darker tones offer a sophisticated, integrated look. Always use exterior-grade paint or stain for weather resistance, applying a primer first for optimal adhesion and durability.
- Decorative Trim & Details: Adding trim around windows, doors, and corners provides a polished finish and helps protect exposed edges from the elements. Consider adding window boxes filled with vibrant flowers or a charming weathervane for a touch of character. For more ideas, check out Decorative Garden Shed Plans.
- Gutters and Downspouts: Essential for directing rainwater away from your shed’s foundation, preventing erosion and potential water damage. Connect them to a rain barrel to harvest water for your garden – an eco-friendly and practical addition.
- Pathways & Landscaping: Create an inviting approach with a gravel path, stepping stones, or even a small patio area in front of the door. Surround the shed with appropriate plants and shrubs to integrate it seamlessly into your landscape.
Interior Organization and Functionality
Transforming the interior from a bare shell into an organized workspace or storage haven is key.
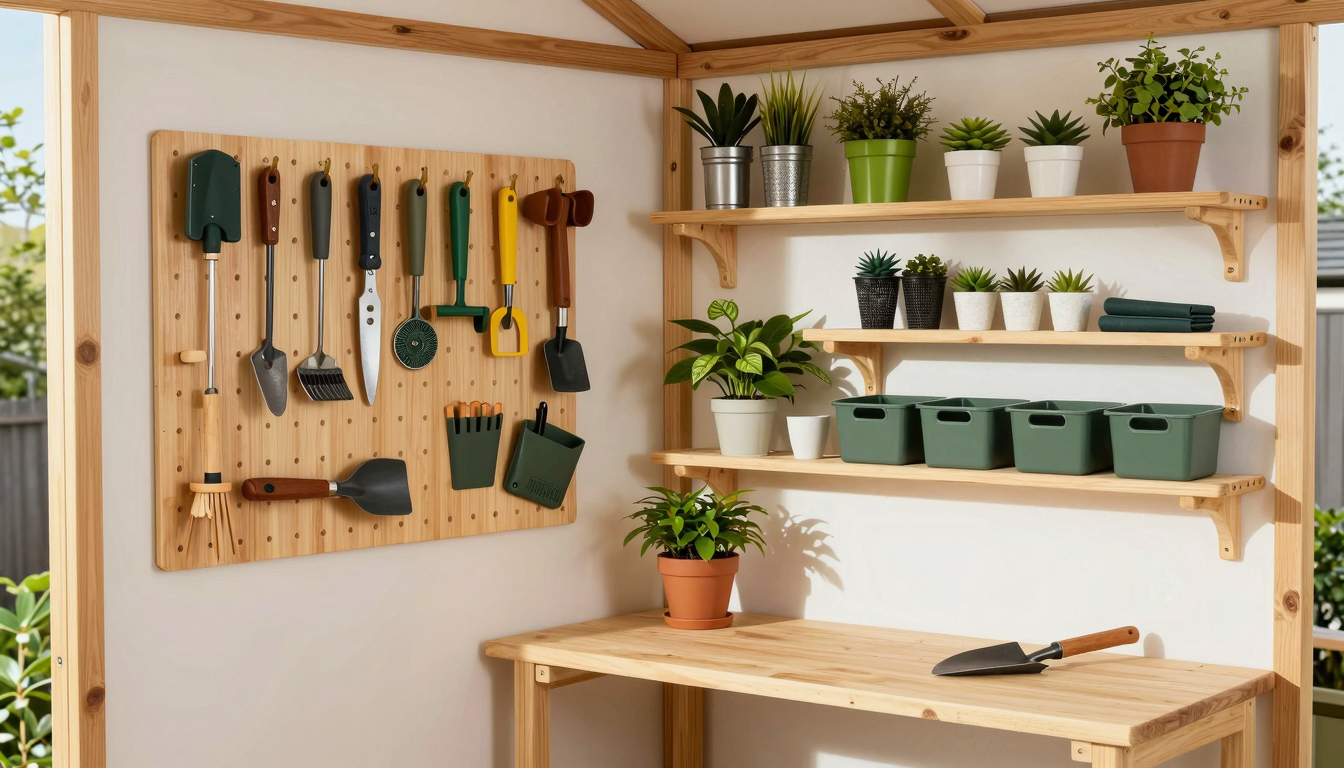
- Smart Storage Solutions: Maximize vertical space with shelves, pegboards, and cabinets. Adjustable shelving offers flexibility for varying item sizes. Consider clear bins for easy identification of contents.
- Workbench Integration: A sturdy workbench is invaluable for potting, repairs, or small DIY projects. Ensure it’s at a comfortable working height and positioned to take advantage of natural light or dedicated task lighting. If you’re building a larger shed for this purpose, consider DIY Large Workshop Shed Plans.
- Lighting and Ventilation: For sheds without electrical wiring, solar-powered LED lights or battery-operated fixtures provide ample illumination. If you plan to run electricity, always consult a certified electrician. Proper ventilation, such as gable vents or a ridge vent, is crucial to prevent moisture buildup, control temperature, and protect stored items from mildew.
- Flooring Options: While a plywood floor is functional, consider adding rubber mats for comfort and protection, vinyl tiles for easy cleaning, or simply painting the floor with a durable epoxy paint for a finished look.
- Insulation: If your shed will be a workshop or used year-round, insulating the walls, ceiling, and even the floor will significantly improve comfort and energy efficiency.
Practical Additions for Enhanced Utility
- Access Ramps: A simple wooden ramp makes moving heavy items like lawnmowers, wheelbarrows, or large planters in and out of the shed much easier and safer.
- Security: Protect your investment and valuable tools with a robust locking mechanism on your shed door. Consider a deadbolt or a heavy-duty padlock and hasp.
These finishing touches not only elevate your shed’s appearance but also enhance its functionality, making it a truly indispensable part of your property. Ready to bring your dream shed to life? Explore our collection of free Free Shed Plans and Material Lists and start building today!
Maintenance and Longevity: Keeping Your Garden Shed in Top Condition
Building your dream DIY shed is a rewarding accomplishment, and ensuring its longevity is just as important as its construction. Regular, proactive maintenance protects your investment, preventing minor issues from escalating into costly repairs and keeping your shed looking its best for decades. Think of it as preventative care for your backyard haven.
Annual Maintenance Checklist: Your Yearly Shed Health Check
Dedicate a day each year to a thorough inspection of your shed. This routine check-up is crucial for early detection of potential problems.
- Exterior Integrity: Walk around your shed, carefully examining all surfaces. Look for peeling paint or stain, which indicates a loss of protective barrier. Check for loose or damaged siding panels and cracked trim pieces. Addressing these promptly prevents moisture intrusion, a shed’s worst enemy.
- Roof Inspection: Climb a ladder safely to inspect your roof. Look for missing, cracked, or curled shingles. Check flashing around vents or chimneys for signs of lifting or damage. Crucially, clear away all debris – leaves, twigs, and moss – especially from valleys and gutters, to ensure proper water runoff. Blocked gutters can lead to water pooling and rot.
- Foundation and Drainage: Examine the base of your shed. Look for cracks in concrete slabs or deterioration of wooden skids. Ensure the ground slopes away from the shed, promoting good drainage. Trim back any vegetation that’s growing close to the foundation, as it can trap moisture against the wood.
- Doors and Windows: Test all doors and windows. Do they open and close smoothly? Are latches secure? Lubricate hinges if they squeak. Inspect window panes for any cracks and ensure seals are intact. Re-caulk around frames if you notice gaps, which can allow drafts and moisture.
- Pest Vigilance: Look for any tell-tale signs of unwanted guests. Small piles of sawdust could indicate wood-boring insects, while chew marks or droppings suggest rodents. Seal any small gaps or holes with caulk or steel wool to deter entry.
- Interior Cleanliness: Declutter and sweep out the interior. This is a good opportunity to check for signs of leaks or dampness inside, which might not be visible from the outside. Ensure proper ventilation to prevent mold and mildew growth.
Periodic Tasks: Long-Term Protection
Beyond annual checks, some tasks need attention every few years to ensure maximum longevity.
- Repainting or Restaining: Depending on your climate and the specific finish, your shed will need a fresh coat of paint or stain every 3-5 years. This isn’t just cosmetic; it’s the primary defense against UV damage and moisture. Choose high-quality exterior products for best results.
- Re-caulking and Sealing: Over time, caulk can dry out and crack. Reapply caulk around all windows, doors, and trim as needed to maintain a watertight seal. This is a simple yet effective way to prevent water damage.
- Gentle Pressure Washing: If your shed’s exterior is looking dingy with dirt or mildew, a gentle pressure wash can restore its appearance. Use a low-pressure setting and a wide fan tip to avoid damaging the siding or forcing water into seams. Always test a small, inconspicuous area first.
By consistently following these maintenance guidelines, your DIY garden shed will remain a robust, attractive, and functional asset to your property for many years to come. To ensure your shed stands the test of time, start with solid blueprints. Explore comprehensive storage shed plans that include detailed material lists and step-by-step instructions.
Embarking on a DIY garden shed project, armed with comprehensive garden shed plans and build backyard shed blueprints, is an incredibly rewarding endeavor. From the initial excitement of choosing your perfect style and foundation to the satisfaction of applying the final coat of paint, every step brings you closer to a functional and beautiful addition to your home. We’ve guided you through the essential planning stages, tool and material acquisition, detailed construction steps, and even the crucial aspects of customization and long-term maintenance. Remember, patience and attention to detail are your best friends throughout this process. Don’t be afraid to take your time, double-check your measurements, and ask for help if needed. With these free resources and a bit of elbow grease, you’re now equipped to build a sturdy, attractive, and perfectly tailored garden shed that will serve your needs for years to come. Happy building!


