

Ready to conquer backyard clutter and add valuable space to your property? Building your own storage shed is a rewarding project that saves you money and allows for complete customization. But where do you start? Many resources offer either free plans or a building guide, but never both. This ultimate guide changes that. We’ve combined a curated list of the best free DIY storage shed plans with a comprehensive, step-by-step tutorial designed for beginners. From pouring the foundation to painting the trim, consider this your all-in-one blueprint for creating the perfect backyard storage solution. Let’s get building!
Before You Build: Planning Your Perfect DIY Shed (Codes, Foundation, and Sizing)

Proper planning is the most critical phase of your shed project. Getting these details right before you buy materials or swing a hammer will save you time, money, and major headaches. Let’s break down the three pillars of a successful shed plan.
1. Decode Your Local Building Requirements
Before you fall in love with a design, you must check with your local building or planning department. Don’t skip this step—an unpermitted structure may need to be torn down. Here’s what to look for:
- Permit Thresholds: Many municipalities don’t require a permit for “accessory structures” below a certain size, often 100, 120, or even 200 square feet. If you’re planning a larger structure, like those in our large garden shed plans, you’ll almost certainly need a permit. Confirm this limit.
- Setbacks: This is the required distance between your shed and property lines, your house, or other structures. A common rule is a 5-foot setback from side and rear property lines.
- Height Limits: There’s almost always a maximum height for sheds, typically around 12-15 feet to the peak.
A quick visit to your town or county’s website is usually all it takes. Search for “accessory structure requirements” or “shed permits.”
2. Determine the Right Size and Location
Think carefully about how you’ll use the shed now and in the future. Will it store a riding mower and snowblower, requiring one of our affordable large shed plans, or just garden tools and bicycles that could fit into a design from our small garden shed plans?
Sizing Tip: To visualize your space needs, lay your largest items on the lawn with enough room to walk around them, then measure that area. A good rule of thumb is to add 25% more space than you think you need—check out our ideas for extra storage space to see why. Once you know your ideal dimensions, you can find the perfect design. For inspiration, our easy to build garden shed plans for beginners are a great place to start exploring different sizes and styles.
For location, choose a spot that is:
- Relatively level to minimize foundation work.
- Accessible for moving materials in and equipment out.
- Well-drained to prevent moisture from rotting the base.
3. Select a Solid Foundation
Your shed is only as strong as its foundation. A level and stable base ensures the frame stays square and the doors and windows operate smoothly for years. Here are three popular DIY-friendly options:
- Gravel Pad: This is the best all-around choice for most sheds. A wooden frame is built on the ground, filled with several inches of compacted gravel. It provides excellent drainage and a very stable surface.
- Concrete Deck Blocks: A fast and budget-friendly option for smaller, lighter sheds (e.g., 8×10 or less), like those in our small garden shed plans. These pre-cast blocks have notches to hold the floor joists. The biggest challenge is getting every block perfectly level with the others.
- Concrete Slab: The most durable and permanent solution, but also the most labor-intensive and expensive. A slab is ideal for a heavy-duty workshop, which is why you’ll want to pair it with one of our DIY large workshop shed plans. It’s also great for garage-style sheds or in areas with very poor soil.
5 Free DIY Shed Plans for Every Skill Level (with Visuals & Material Lists)
Now that you have a solid plan, it’s time to choose a design that fits your space, skill level, and storage needs. We’ve selected five popular and free DIY shed plans that offer clear instructions and impressive results. Each of these styles can be adapted, but they provide a fantastic starting point for your project.
Find Your Perfect Shed Design
Here are five versatile plans, ranging from simple weekend projects to more ambitious structures.
1. The Simple Lean-To Shed
This is the ultimate beginner-friendly project. The lean-to design features a single-slope roof that presses against an existing structure like your house or a sturdy fence, saving space and materials.
- Best For: First-time builders and tight backyard spaces.
- Typical Use: Storing long-handled garden tools, lawn care supplies, and firewood.
- Key Feature: Its straightforward construction and simple roof framing make it a quick and economical build, often completed in a single weekend.
2. The Classic Gable Shed
When you picture a backyard shed, you’re likely thinking of a gable design. Its traditional A-frame roof is not only iconic but also highly functional, creating valuable overhead space for a storage loft.
- Best For: Intermediate builders needing all-purpose storage.
- Typical Use: Housing a push mower, wheelbarrow, bikes, and general household overflow.
- Key Feature: The symmetrical roof is relatively easy to frame and provides excellent water and snow runoff.
3. The High-Capacity Gambrel Shed
For maximum storage, nothing beats a gambrel shed. The barn-style roof design creates a full-sized upper loft, nearly doubling your storage capacity without increasing the shed’s footprint.
- Best For: Homeowners with significant storage needs for bulky or seasonal items.
- Typical Use: Storing holiday decorations, patio furniture, and large equipment.
- Key Feature: The immense overhead storage is the main draw, offering the most cubic footage of any design.
4. The Modern Studio Shed
Sheds aren’t just for storage anymore. A modern shed, with its clean lines, pent (single-slope) roof, and capacity for large windows, can become a functional extension of your home.
- Best For: A home office, art studio, workshop, or stylish backyard retreat.
- Typical Use: Multi-purpose use beyond simple storage.
- Key Feature: The emphasis is on aesthetics and light, creating a usable, insulated space that adds value to your property.
5. The Charming Saltbox Shed
With its distinctive asymmetrical roofline—long in the back and short in the front—the saltbox design offers colonial charm and practical benefits. The long rear roof slope is excellent for deflecting wind and rain.
- Best For: Intermediate builders looking for a unique style.
- Typical Use: A visually interesting storage shed or a quaint potting station.
- Key Feature: The taller front wall allows for a higher door opening and more front-facing headroom than a standard gable shed.
To get started, you can find detailed blueprints, material lists, and cut lists for these styles and more by exploring free plan repositories. For a great collection of proven designs, check out the free shed plans available at Construct101.
The Ultimate Step-by-Step Guide to Building a Shed from Scratch
With your foundation prepped and one of our detailed large shed plans in hand, it’s time to bring your shed to life. This guide breaks down the standard building process for a wood-framed shed, a method suitable even for first-timers. If you’re new to this, our easy to build garden shed plans for beginners offer a great starting point. Always prioritize safety by wearing protective gear and handling tools with care.
From the Ground Up: Floor and Walls
The strength of your shed starts with a solid base and square walls. Work methodically on a level surface.
- Construct the Floor Frame: Position your pressure-treated skids on the prepared foundation. Build your floor frame directly on the skids using 2×6 lumber for the joists. Space inner joists 16 inches on-center.
Pro Tip: To ensure the frame is perfectly square, measure the diagonals from corner to corner. The two measurements must be identical. Adjust the frame until they match before securing the joists with 3-inch deck screws.
- Attach Floor Sheathing: Apply a bead of construction adhesive along the top of each joist to prevent future floor squeaks. Lay 3/4-inch tongue-and-groove plywood sheets perpendicular to the joists and fasten them with screws every 6 to 8 inches.
- Assemble and Raise the Walls: Build each of the four wall frames on the flat shed floor. Use 2x4s for the top plates, bottom plate, and studs (spaced 16 inches on-center). Remember to frame out openings for your door and any windows, including sturdy headers above them to support the roof’s weight. The size and placement of these openings will vary, especially if you’re building a specialized structure like one from our DIY large workshop shed plans, which often require larger doors and more windows for light. With a helper, carefully lift each wall into position, check that it’s plumb (perfectly vertical) with a 4-foot level, and secure it to the floor. Brace it with temporary supports before raising the next wall and screwing the corners together.
Raising the Roof and Finishing the Structure
With the walls up, the structure will quickly take its final shape.
- Build and Install Roof Trusses: For a classic gable roof, you need to build identical triangular trusses.
Best Practice: Create a simple jig on the shed floor using scrap wood blocks to frame your first completed truss. This ensures all subsequent trusses are uniform.
Lift the trusses onto the wall’s top plates, typically spacing them 24 inches on-center, and fasten them with hurricane ties for superior strength against wind.
- Add Siding and Roof Sheathing: It is often much easier to install wall siding panels before sheathing the roof. Your choice of siding is also a chance to add personal flair; for inspiration, check out our decorative garden shed plans for stylish ideas. Once the walls are sided, move to the roof. Install 1/2-inch OSB or plywood sheathing over the trusses, starting from the bottom edge and working up to the peak.
- Build and Hang the Door: Construct a simple door using a 2×4 frame and a piece of siding that matches the walls. Add a “Z-brace” to the back of the door to prevent it from sagging over time. Hang it with heavy-duty T-hinges and install a secure latch to complete your build.
If you’re still deciding on the perfect design, browsing a few options can provide clarity. Whether you need affordable large shed plans for maximum storage on a budget or prefer compact small garden shed plans, we have a design for you. You can also find several excellent, detailed blueprints at https://www.construct101.com/6-free-shed-plans/ to help you visualize your project.
Estimating Your Project: A 2024 Breakdown of Shed Material & Tool Costs
A well-planned budget is the foundation of any successful DIY project. Starting with affordable garden shed plans can give you a great head start, but total costs will still range widely based on your location, the complexity of your plan, material choices, and whether you need to invest in tools. This 2024 breakdown will help you create a realistic budget before you start building.
Gearing Up: Essential Tools for Your Shed Build
If you’re new to DIY, you’ll need to acquire some essential tools. While a seasoned builder may own these already, factoring in tool costs is critical for anyone following easy to build garden shed plans for beginners.
- Power Tools: A circular saw ($75 – $200) is your workhorse for cutting framing lumber and sheathing. A reliable power drill/driver ($100 – $250) is non-negotiable for driving the hundreds of screws required.
- Measurement & Layout: You cannot build a square and level shed without a 4-foot level ($30 – $60), a 25-foot tape measure ($15 – $30), and a speed square ($10 – $20) for marking quick, accurate angles.
- Hand Tools: A sturdy framing hammer ($20 – $40) is essential for adjustments and nailing.
Pro-Tip: Consider renting larger, more expensive tools like a power miter saw or a framing nailer if you don’t plan on using them for future projects. This can significantly reduce your initial investment.
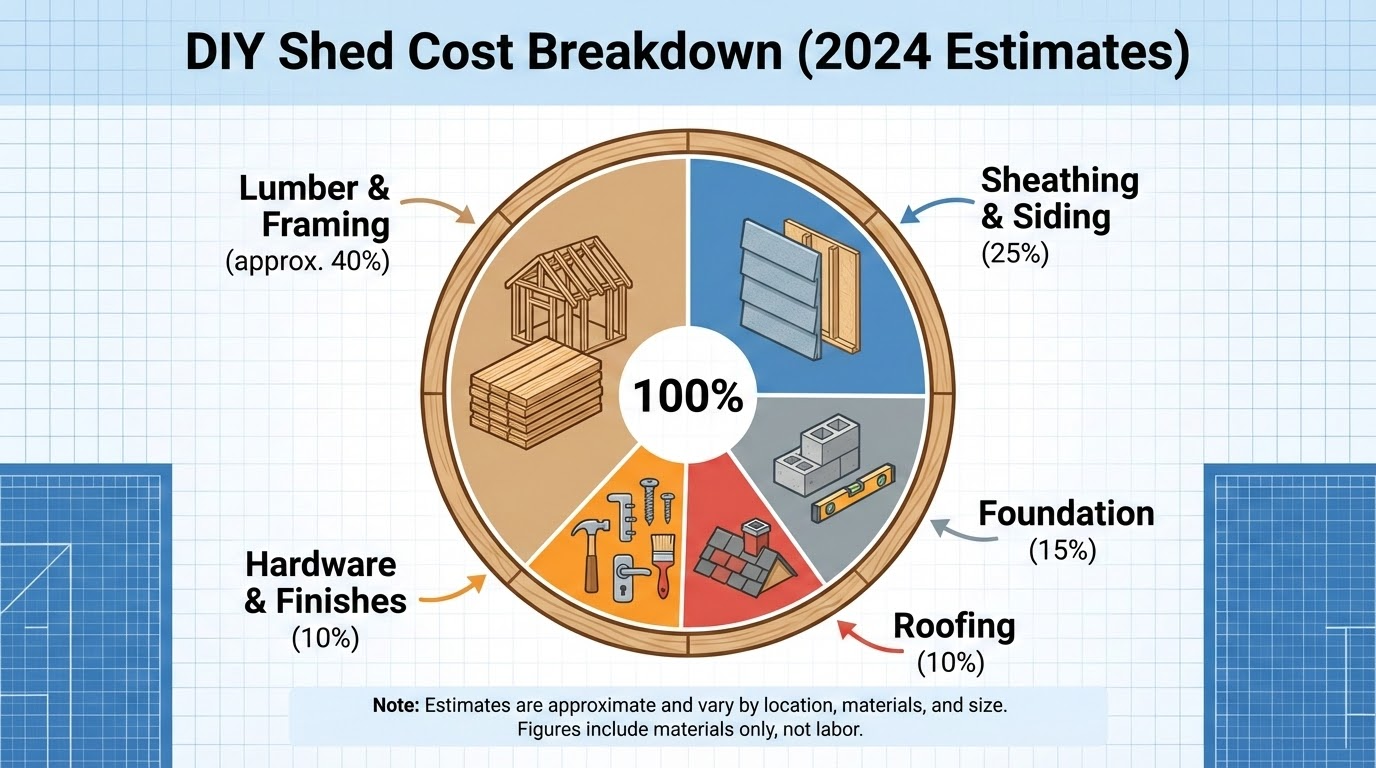
Estimating Your Material Bill: A Sample 8×10 Gable Shed
Material prices fluctuate by region and supplier, so always get a detailed quote from a local lumber yard. However, this sample budget for a standard 8×10-foot shed, a popular size found in many small garden shed plans, provides a strong baseline for 2024.
- Foundation: $150 – $400. This covers concrete blocks or pressure-treated skids, gravel for drainage, and landscape fabric.
- Framing Lumber: $600 – $1,000. The largest part of your budget, this includes all the 2×4 and 2×6 lumber for the floor, walls, and roof trusses. Keep in mind this cost will increase substantially for large garden shed plans.
- Sheathing & Siding: $500 – $900. This estimate includes plywood or OSB for the floor and roof deck, plus a common siding choice like T1-11 panels. For more stylish options that can transform your backyard’s look, explore our decorative garden shed plans.
- Roofing: $200 – $400. Covers asphalt shingles, underlayment (tar paper), drip edge, and roofing nails.
- Fasteners & Hardware: $150 – $250. Don’t forget the cost of screws, nails, hurricane ties, door hinges, and a latch.
Total Estimated Material Cost: $1,600 – $2,950
Budgeting carefully is the first step. The next is choosing a design that fits your budget and skill level, whether that’s a simple structure or a more complex project like a DIY large workshop shed. Exploring different plans will help you see how these material costs can be applied to various designs.
Finishing Your Shed: Essential Tips for Roofing, Siding, and Customization
With the main structure standing, you’re on the home stretch. The finishing touches are what transform your wooden frame into a durable, attractive, and functional outbuilding. This phase is all about protecting your investment from the elements and injecting your personal style.
Weatherproofing from the Top Down
A watertight roof is your first and most critical priority. A proper installation now prevents costly water damage later. Follow this sequence for a professional, leak-proof result:
- Install Drip Edge: Attach a metal drip edge along the entire perimeter of the roof sheathing. This simple component is essential for directing water away from the fascia and into your gutters (if you have them), preventing rot.
- Add Underlayment: Roll out roofing felt (tar paper) or a modern synthetic underlayment. Start at the bottom edge of the roof and work your way up, overlapping each course by at least 6 inches to ensure water sheds properly.
- Lay Shingles: For a classic and budget-friendly option, use asphalt shingles. Begin with a dedicated “starter course” at the eave, then lay your first full course directly on top. Continue working your way up to the peak, and finish by installing a ridge cap to seal the apex of the roof.
Installing Siding and Trim
Siding is your shed’s primary shield against wind, rain, and sun. Proper installation is key to its longevity.
- Siding Application: If you’re using panel siding like T1-11, make sure to seal the seams thoroughly with a quality exterior caulk. For lap siding, start at the bottom and ensure each course is perfectly level, overlapping the one below it according to the manufacturer’s instructions.
- Trim for a Finished Look: Install trim boards on all four corners, as well as around your door and any windows. This not only covers the raw edges of the siding for a professional look but also provides another opportunity for weather sealing.
- Caulk Everything: Use a high-quality, paintable exterior caulk to seal every seam, gap, and joint. This is one of the most critical steps for weatherproofing your entire structure.
Painting and Final Customizations
Now for the fun part—adding personality and function. A quality paint job is your shed’s final layer of defense. Always start with an exterior primer on any bare wood, followed by at least two coats of premium exterior paint.
Once painted, make the shed truly your own:
- Build a Sturdy Ramp: A simple wood ramp makes moving lawnmowers and wheelbarrows effortless.
- Maximize Interior Space: Install wall-mounted shelving, a pegboard for tools, or heavy-duty hooks to get items off the floor.
- Add Natural Light: Installing a simple fixed-pane window or an opening window can make your shed feel more spacious and usable.
- Boost Curb Appeal: Small touches like decorative shutters or a window box for flowers can elevate your shed from a storage box to a charming backyard feature. For more ideas on different shed styles you can build, exploring a variety of designs from affordable large sheds to small garden sheds can provide excellent inspiration.
Congratulations! You now have the complete roadmap to take your DIY storage shed from an idea to a finished reality. By combining the right plan with a methodical building process, you can create a durable, functional, and beautiful structure that you’ll be proud of for years to come. You’ve learned how to plan your project, select a free design, build it from the ground up, and add the perfect finishing touches. This is more than just a shed; it’s a testament to your skill and hard work. Ready to take the final step? Download our comprehensive checklist to ensure you don’t miss a single detail on your building journey.


